MAIN FEATURES
1. Easy-to-use, ergonomic transmitter.
2. Waterproof receiver for wet conditions, only waterproof after the rubber cover
is placed over charging jack.
3. Rechargeable collar and transmitter can be charged at the same time.
4. Rheostat dial that allows for gradual increases in stimulation intensity between
0-100 levels.
How the Petrainer Rechargeable and Waterproof LCD Remote
Pet Training System Works
Petrainer Rechargeable and Waterproof LCD Remote Pet Training System has
been proven safe, comfortable, and effective for all pets over 8 pounds. This system
assists you in controlling your pet without a leash in a range up to 328 yards (300m).
At the push of a button, the Remote Transmitter sends a signal, activating the
Receiver Collar. Using the Remote Trainer consistently and correctly, misbehaviors
that your pet exhibits will be corrected or any basic obedience commands can be
taught.
Important: The Remote Trainer has a range up to 328 yards. Depending on the
way you hold the Remote Transmitter, the range may vary. Hold the Remote
Transmitter in a horizontal position away from your body to achieve optimum range.
Terrain, weather, vegetation, transmission from other radio devices, and other
factors will affect the range of your Remote Trainer.
5. 4 training modes: static shock/ vibration/ beep/ light.
6. The Petrainer Element 998DRU has a 300 meters range.
7. Two-dog model allows the trainer to control two dogs from one transmitter.
8. Power saving design with automatic standby and memory function.
9. No external antenna on the collar receiver.
10. Small receiver/collar is ideal for small and medium size dogs.
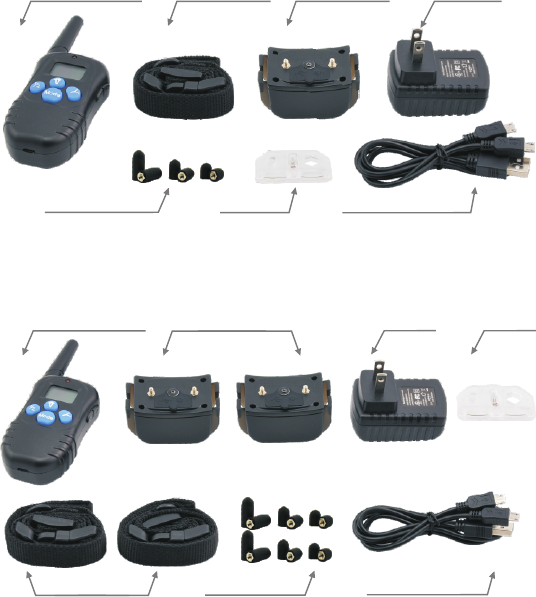
IS-PET998DRU 1 for 1
Components
IS-PET998DRU 1 for 2
Charger
Testing Bulb
3 sets of Contact Points
with silicone covers
Receiver Collar
Remote Transmitter
Charger
6 sets of Contact Points
with silicone covers
Remote Transmitter
Receiver Collar
Adjustable Belt
USB Cable and
Resembling splitter cable
USB Cable and
Resembling splitter cable
Adjustable Belt
Testing Bulb
-3-
-4-
-5-
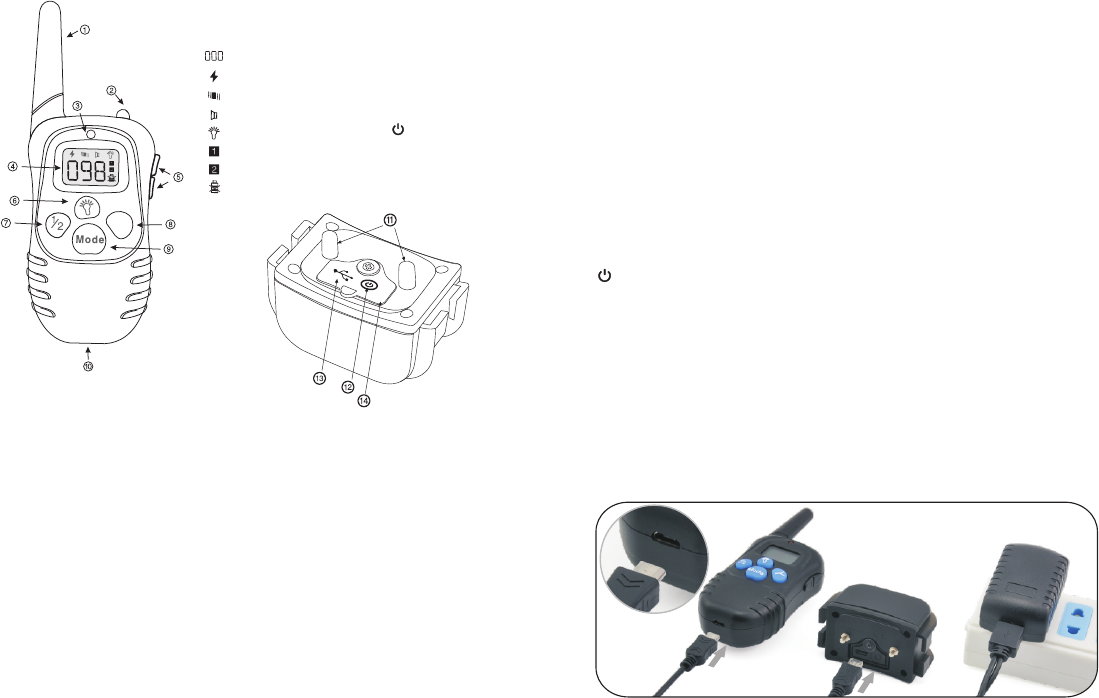
Key Definitions
Y
5. U
6. Led Light Button
7. Channel Button
8. Launch Button
9. Mode Button
10. Transmitter Charging
Jack
11. Contact Points with
Silicon Covers
12. Button
13. Receiver Charging
Jack
14. Rubber Cover
p/Down Button
Channel 1
Channel 2
Low Battery Indicator
1. Antenna
2. LED Light
3. LED Indicator
4. LCD Screen
Light Mode
Static Shock Mode
1-100 Level
Vibration Mode
Beep Mode
1. Antenna: Transmits the signal from the Transmitter to the Receiver Collar.
2. Led light: This light will be on when pressing the LED light button.
3. LED Indicator: This light will flash when the “Y” button is pressed. The light
will be activate when charging as well.
4. LCD Screen:
Static mode: With this mode selected, pressing the “Y” button will cause the
receiver to emit shock.
-6-
Vibration mode: With this mode selected, pressing the “Y” button will cause
the receiver to vibrate.
Beep Mode: With this mode selected, pressing the “Y” button will cause the
receiver to emit a beep sound.
Light Mode: With this mode selected, pressing the “Y” button will cause the
LED light on the receiver to flash red once every second. Its primary purpose
is to help locate your pet.
Channel 1: Indicates the selection of the first collar receiver.
Channel 2: Indicates the selection of the second collar receiver.
5. Up/down buttons: Selects intensity level for Vibration and Static Shock.
6. Led light button: When pressing the LED light button, the LED light on the
transmitter will be on.
7. Channel button: Pressing this button will swap between the first and second
collar receiver.
8. Launch button: Sends the signal from transmitter to receiver, resulting in
stimulation, beep or light, depending on your mode selection.
9. M o de bu t ton : P res s t hi s b u tt o n to swi tch be t wee n m ode s. T her e a re 4
mo d es: S t ati c, Vibr a tio n, Bee p a nd li g ht mo d e.
10. : Insert charging connector into charging hole to
charge the Transmitter.
Transmitter Charging Jack
11. Contact Points: Helps deliver safe static correction. Do not remove silicone
covers as it helps protect dog's neck from irritation due to the stainless steel
contacts. Static shock can still be felt through silicone covers.
12. button
2) Pair the transmitter and receiver.
: 1)Turn ON/OFF the receiver collar.
13. Receiver Charging Jack
charge the receiver.
: Insert charging connector into charging jack to
14. Rubber Cover: Seals charging jack to keep dust and water from entering. If
not sealed, then the item will not be waterproof.
HOW TO USE
Note: Please charge before using the product! Please ensure you're putting
the correct side of the cable into the USB charger port as the connector is not
the same size on both ends.
-7-
-8-
4) Charge the transmitter for 2 hours.
5) After charging is complete, the red light will turn off automatically.
2. Charge the collar receiver:
1) Connect the charger connector to the charging jack.
2) Plug the charger into a standard outlet.
3) The red light will appear on the receiver.
4) Charge the receiver for 2 hours.
5) After charging is complete, the red light will turn off automatically.
3. Pairing the Remote Transmitter and Receiver Collar:
1. Charge the remote transmitter:
2) Plug the charger into a standard outlet.
3) The red light on the transmitter will light up.
1) Connect the charger connector to the charging jack.
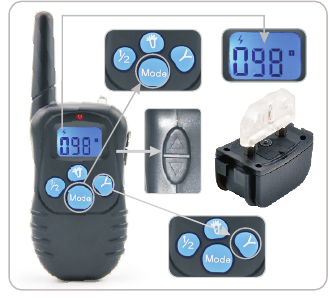
4. Test static shock function:
1) Place the test light to the contact points with the silicone covers on. (Static
shock can still be felt through silicone covers, do not remove, as it helps
protect your dog from skin irritation from the stainless steel contact point).
2) Select Static Mode by pressing the “Mode” button.
3) Select static stimulation level by pressing UP/DOWN button and choose
between 1-100 stimulation levels.
4) Press “Y” button, and the LED will flash on.
Important: Please see diagram below on how to attach the test light:
Important Notice: If wishing to test the static function on yourself, remember
to place your finger or hand against both contact points with silicone covers on.
Otherwise, the connection won't be completed and no stimulation will be felt.
1) Power on the Collar Receiver by pressing the PAIR button on the Collar Receiver.
A beep will sound, and the indicating light will turn on.
3) Pres s th e Y bu tton on the Remote Tra ns mi tt er o nce the Receiver Coll ar
b ee ps . Wh en the Remote Tr an sm it te r an d Collar Receiver a re p ai re d
s uc ce ss fu ll y, the Collar R ec ei ve r will beep again, and th e in di ca ti ng light
w il l tu rn o ff.
4) If needin g to pai r a second Collar Receiver, follow t he same steps but first
press 1/2 but ton to differ ent channel.
Note: Pairing has to be finished within 10 seconds after the 1st beep from the
Receiver
Collar. Meaning, you have to press the Y button within 10 seconds of
the 1st beep for pairing to be completed.
2) Press and hold the PAIR button for 3 seconds until beep sounds, the indicating
light will begin to flash quickly.
Static Shock Stimulation Tester
In your package that you received, you will find a clear almost translucent plastic
piece that has a light bulb/fuse in the middle of it. This is your Static Shock
Stimulation tester. This component DOES NOT attach to the Collar Receiver by
any means and is only for testing the static shock mode. To test static shock
function, follow these steps:
Test Vibration Function
Press Mode button on the Remote Transmitter, switch to Vibrate mode, confirm
using the LCD display that the stimulation level is not at 0, you can press UP/
DOWN button on the right side to adjust.
Press Y button, Remote Collar will vibrate, that means Vibration Function works.
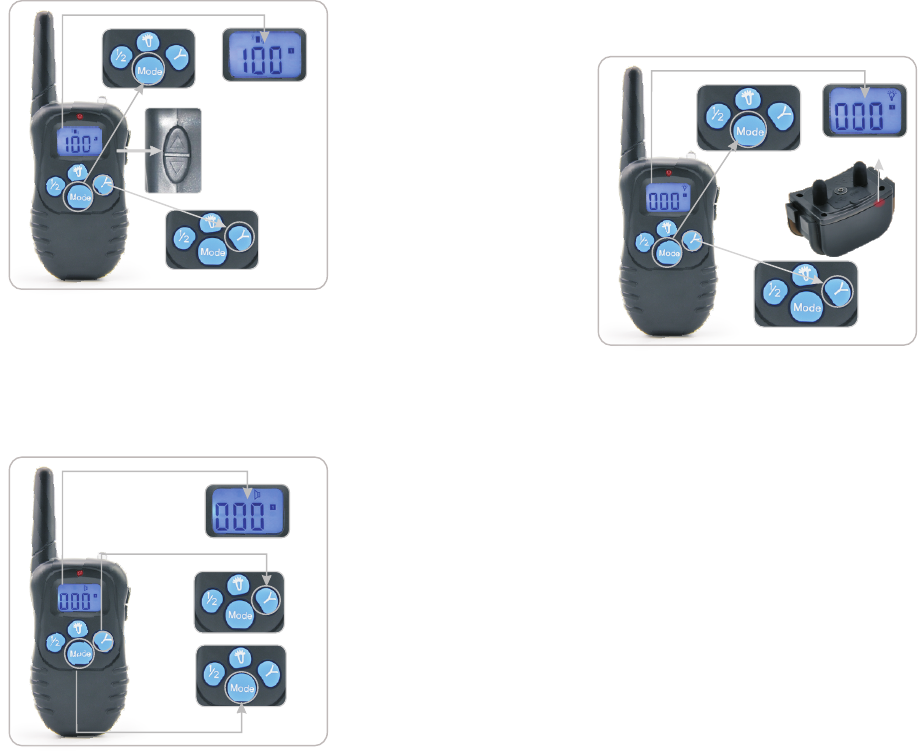
Test Beep Function
Press Mode button of Remote Transmitter, switch to Beep Mode.
Press Y button, Receiver Collar will beep, that means Beep Mode works.
Important: If the transmitter is in sleep mode (the LCD display is turned off) you
must press the “Y” button once to wake up the unit, then press the “Y” button again
to send the signal from the remote to the collar receiver. This applies to all functions.
Test LED light Function
Press LED light Button, LED light will turn on, means LED light button works.
Note:
I: If LCD of Remote Transmitter does not display, there is probably two reasons:
1. Light Standby: In order to save power, the Remote Transmitter will go into
Standby Mode if there is no operation after 20 seconds, press any button
except LED Light Button to activate Remoter Transmitter, LCD will display.
2. Deep Sleep: In order to save power, the Remote Transmitter will go into Deep
Sleep Mode if there is no operation after 1 minutes, press the Mode button to
activate the Remote Transmitter, LCD will display.
II: The receiver collar will go into deep sleep if no operation for 4 minutes. And any
movement by the dog will activate the receiver.
If the Receiver Collar has no response when you press the Y button, and the
Indication light of the Receiver Collar is not on either, you can shake Receiver
Collar or force the dog to move, and the indication light of the Receiver Collar
will show green, which means the Receiver Collar is active and will work.
III: When testing, choose any mode except LED light. When you are under Vibration
or Static Shock mode, Intensity Level cannot be at a stimulation level of 0, press
UP/DOWN to adjust.
-9-
-10-
LED light will turn on
Fit the Receiver Collar with your dogs:
Attaching the Contact Points
In your package that you received, you will find 3 sets of contact points with
silicone covers placed over the contact points, DO NOT REMOVE the covers as
they protect your dog from the irritation from the contact points.
These contact points are screwed onto the receiver so that the points can effectively
contact the dogs skin without hair/fur interfering with the connection.
Important: The proper fit and placement of your collar is important for effective
training. The Contact Points must have direct contact with your pet's skin on the
underside of the dog's neck.
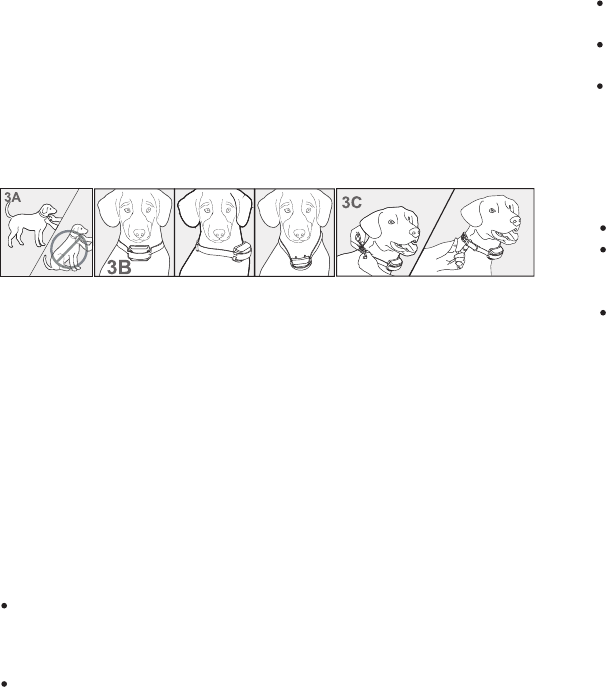
To assure a proper fit, please follow these steps:
1. Have your pet standing comfortably (3A).
2. Centre the Contact Points underneath your pet's neck, touching the skin (3B).
If your pet has a long or thick coat, please use longer Contact Points, we enclosed
3 sets Contact Points, short ones and longer ones.
CAUTION: There are 100 levels for Vibration and Stimulation. The strong
Stimulation can penetrate the hair of the pet and fabric within 6mm thick. Do not
shave the pet's neck as this may increase the risk of skin irritation.
3. The Collar should fit snugly, yet loose enough to allow one finger to fit between
the strap and your pet's neck(3C).
4. Allow your pet to wear the collar for several minutes then recheck the fit. Check
the fit again as your pet becomes more comfortable with the Collar. If your pet's
neck is less than 12”around, you will need to thread the part of the collar through
the buckle. It will be a tight fit.
CAUTION: Risk of skin damage.
For comfort, safety and effectiveness of this product. Please ensure that you
check the fit of your pet's collar frequently. If any skin irritation is observed,
discontinue the use of the collar for a few days. If the condition persists beyond
48 hours, see your veterinarian.
Do not attach a leash to the Collar. This can result in pulling the Contact Points
too tightly against your pet's neck. You may put a separate nonmetallic collar
on your dog's neck and attach a leash.
The Receiver Collar is not designed to be worn constantly. We recommend the
Collar not be worn for more than 12 hours out of every 24-hour period.
Most pets feel uncomfortable at first wearing the collar. Don't use any functions
until the pet has gotten used to the collar.
We suggest you give the dog Vibration before starting the Static Shock. After a
time of training, the dog will learn that Static Shock Stimulation will come after
Vibration. In this way, the vibration alone can effectively curb the improper
deeds of the pet. The Stimulation only acts as a menace that might be
unnecessary most of the time.
-11-
-12-
5. Regular Maintenance
Check Contact Points for tightness weekly.
Clean Contact Points with alcohol weekly.
Note: remove the battery and discharge Regular the Bark Automatic Control
Collar before touching the Contact Points.
Check your dog's neck for irritation and wash neck weekly.
Frequently Asked Questions
How old does my pet have to be before using Petrainer Rechargeable and
Waterproof LCD Remote Pet Training System?
Your pet should be able to recognize basic obedience commands such as “Sit” or
“Stay.” Petrainer Rechargeable and Waterproof LCD Remote Pet Training System
may be too large for pets under 8 pounds.
Once my pet is trained and has been obeying my commands, will my pet have
to continue to wear the Receiver Collar?
Probably not. You may need to reinforce training with the Receive Collar from time
to time.
Can I use Petrainer Rechargeable and Waterproof LCD Remote Pet Training
System with more than one pet?
Yes, there is 2 series with our Petrainer Rechargeable and Waterproof LCD Remote
Pet Training System, one kind is 1V1 (1 Transmitter to 1 Receive Collar) TT-PT05;
the other one kind is 1V2 (1 Transmitter to 2 Receive Collar) TT-PT06
Will I get exactly 328 yards of range with the Remote Trainer?
The effective range of the Remote Trainer means the straight-line distance
between Remote Transmitter and Receiver Collar without obstacles in between.
Range may vary according to terrain, weather, vegetation, battery capability as
well as transmission from other radio devices.
How long can I continuously deliver vibration or Static Shock to my pet?
The maximum amount of time you can press the Vibration or Static Shock to your
pet continuously is 10 seconds. After this, the Remote Transmitter will time-out,
and the Vibration or Static Shock must be released and pressed again.
Is the Receiver Collar waterproof?
Yes, your pet can swim in the water.
What do I do if my pet's neck becomes red and irritated?
Discontinue use of the Petrainer Rechargeable and Waterproof LCD Remote Pet
Training System for a few days. If the condition persists beyond 48 hours, see
your veterinarian. Once the skin returns to normal, monitor your pet's skin condition
closely.
-13-
-14-
Can I attach a leash to the Receiver Collar?
NO. This can result in pulling the Contact Points too tightly against your pet's neck.
Use a separate collar placed above the Receiver Collar.
How will I know when to charge the batteries?
For Remote Transmitter: the symbol will show up on the right side of LCD screen.
For Receiver Collar: You will hear a beep for 20 seconds, indicating the device
needs to be charged.
How long is your lithium battery lifetime?
Our Lithium battery can charge 400 times for remote Control and Receiver Collar.
How long can I leave Receiver Collar on my dog?
The Collar is not designed to be worn constantly. We recommend the Collar not
be worn for more than 12 hour out of every 24-hour period.
How long should my training sessions be for my pet?
Training sessions should be kept positive and short, it is better for about 10-15
minutes long each session.
What kind of dogs are y our Petrainer Rec har gea ble and Waterproof LCD
Remote Pet Training Sy ste m suitable for?
The collar is adjustable from length 5.9”(15cm) to 19.6”(50cm),if your pet's neck
is smaller than 5.9”, you have to rethread it, if your pet's neck is larger than 22”,
please don't buy it: and this Collar is not suitable for the dogs less than 8 pounds
either.

Troubleshooting
My pet does not respond after correct installation Petrainer Rechargeable
and Waterproof Training Collar.
You need to charge the Remote Transmitter and Receiver Collar for 2 hours
individually first.
You need to turn on the Remote Transmitter by holding the mode button for 5
seconds.
Check the levels of vibration or static shock.
Make sure the Receiver has enough power to operate.
Restart the Receiver collar by pressing the on/off button.
Test 4 functions (Beep, Light, Vibration and Shock) first before using. See part
“Test” of Operation Guide.
Intensity level has to be more than “0” when pairing. Test launch for vibration
and Static Shock Function.
The Receiver Collar will go into deep sleep if no operation for 5 minutes and
any dog movement will activate the device.
Make sure the Contact Points are placed snugly against your pet's skin.
Trim your pet's fur where the Contact Points touch the neck or switch to the
longer Contact Points.
If none of the above works, you can try repairing between the Remote Transmitter
and Receiver Collar. (See part “Pairing” of Operation Guide)
Remote Transmitter does not work.
You need to charge the Remote Transmitter for 2 hours when you get product
for the first time.
Check if the Remote Transmitter is on low battery status, the symbol will show
up on the right side of the LCD screen.
You need to hold the Mode button on the Remote Transmitter for 5 seconds to
power it the device on.
Remote Transmitter automatically goes into standby mode if no action is
detected within 20 seconds, at this time there will be no LCD display. Press
any button to re-activate the Remote Transmitter.
Remote Transmitter will automatically goes into deep sleep status if no action
is detected within 2 minutes. At this time, there will be no LCD display. You have
to press “Mode” button for 5 seconds until the LCD display reappears.
-15-
-16-
My Receiver Collar works great for some time, but it does not work anymore
after I charged the device.
First, check if charging is successful, when you are charging, red LED light will
be on, after fully charged, the red led light will turn off automatically.
You have to turn on Receiver Collar again after you're finished charging.
We turned on the receiver collar and it starts to beep for 20 seconds.
Receiver Collar will beep for 20 seconds in low battery status unless it gets
charged. Charge it for 2 hours and the other functions will work after charging
is finished.
Our Receiver Collar is designed to not be knocked down, please don't knock
down the device, to avoid breaking structure and circuits.
I want to test Receiver Collar myself, but it does not work.
If you test Receiver Collar by your hand or leg, please touch the 2 electrodes
at the same time, only touching one electrode will not work.
This device complies with Part 15 of the FCC Rules. Operation is subject to the
following two conditions:
NOTE 1: This equipment has been tested and found to comply with the limits for
a Class B digital device, pursuant to part 15 of the FCC Rules. These limits are
designed to provide reasonable protection against harmful interference in a
residential installation. This equipment generates, uses and can radiate radio
frequency energy and, if not installed and used in accordance with the instructions,
may cause harmful interference to radio communications. However, there is no
guarantee that interference will not occur in a particular installation. If this
equipment does cause harmful interference to radio or television reception, which
can be determined by turning the equipment off and on, the user is encouraged
to try to correct the interference by one or more of the following measures:
(1) This device may not cause harmful interference, and (2) this device must accept
any interference received, including interference that may cause undesired
operation.
FCC Notice
- Reorient or relocate the receiving antenna.
- Increase the separation between the equipment and receiver.
- Connect the equipment into an outlet on a circuit different from that to which the
receiver is connected.
-Consult the dealer or an experienced radio/TV technician for help.
Digging
It is important to first understand why your pet is digging. Many dogs, such as
terriers, were bred to flush out prey, and digging is very innate to them. Other dogs
may be digging to find a cool spot to lie down, or simply out of boredom. Your pet
may no longer have the desire to dig if he is provided with the following: A cool,
shaded area in which to lie down, and plenty of water. An alternate activity, such
as a favorite toy. Plenty of play, exercise, and attention. A yard free from rodents
or prey that he may be trying to flush out.
1. Place the Receiver Collar on your pet and wait at least 10 minutes before placing
him in the yard. No other people or pets should be in the yard, as you do not want
your pet to associate the stimulation with anything other than his digging. Your
pet must be securely fenced in or contained during training.
2. From a window or area where your pet cannot see you, wait until your pet begins
to dig.
3. While your pet digs, press the Stimulation Button and release it when he stops
digging. Only press the button while your pet is in the act of digging, and do not
say anything to him.
4. If your pet ignores the stimulation, increase the Intensity Level.
5. Continue to watch your pet, as he may choose another area to dig.
6. Do not allow your pet in the yard unsupervised until he has completely stopped
digging.
Chasing
Chasing is an instinctive behavior stimulated by moving objects. Some dogs have
a particularly strong desire to chase that can put them in harm's way and leave
you helpless. Never allow your dog off the leash or out of a contained area until he
has learned the “Come” command, regardless of the distraction. Be consistent
and correct your dog every time he chases something. It is vitally important that
you and your dog remain safe while learning during on-leash training. Your dog
should be on a strong leash, long enough for him to attempt to chase an object,
but short enough for him not to reach a road or other unsafe area. You must also
be physically strong enough to restrain your dog when he tries to chase.
1. If your dog has not learned the “Come” command, keep a leash on him so you
can physically stop him before he reaches the object he is chasing.
2. Set up a scenario where your dog is enticed to chase an object. Common items
could be cars, motorcycles, bicycles, etc. (do not use toys).
3. When the object passes in front of your dog, make sure to hold the leash with
a firm grip. As soon as your dog begins to chase the object, press and hold the
Stimulation Button until he stops.
4. When your dog stops chasing the object, immediately release the button, walk
backwards and give the command “Come.” Praise your dog as he comes to you.
5. Repeat the process until your dog stops chasing the object.
Trash Raiding
The easiest way to prevent trash raiding is to remove garbage and tempting food
from your pet's environment. You can use the Remote Trainer to teach your pet
to stay away from these items; however, you must be prepared to correct your pet
every time he approaches them.
1. Pick a temptation for your pet and position yourself where he cannot see you.
2. While your pet's mouth is touching the temptation, press and hold the Stimulation
Button. Immediately release the button when your pet leaves the temptation.
3. Do not say anything, as you want your pet to associate the stimulation with his
behavior, not you.
4. If your pet does not respond to the stimulation, increase the Intensity Level and
repeat the process.
5. Repeat this process in several different locations with different temptations.
(3) During initial training sessions, keep your dog in a familiar outdoor environment
e.g. an enclosed area of the garden and away from other dogs/animals and
people. Training in new locations may cause your dog to become distracted
causing you to reinforce your commands with the remote collar-receiver more
often collar-receiver more than accordingly.
General Training Tips
The following are tips on how to get the best out of your Petrainer Remote
Pet Training Collar:
(1) Make the training sessions short and positive (between 10-15 minutes long
for each time), which will enable your dog to keep its attention focused on you.
(2) Train one dog at a time.
(4) Use a long leash fastened to a non-metallic collar to help his/her learning.
Ensure the additional collar and leash does not interfere with the skin contact
of the metal probes on the collar-receiver. Do not use the remote training collar
without a long leash until your dog is fully trained.
-4-
-3-
Perfecting Basic Obedience
Note: When we refer to stimulation button this will change depending on your
model, for models PET998DR, PET998DB, this will be your “Y” button. For any
other models, there should be a stimulation button for each type of stimulation
(static shock, vibration and beep).
The “Sit” Command
1. Put a separate, non metallic collar on your pet's neck above the Receiver collar
and attach at least a 10-foot leash.
Note: Be sure the extra collar does not put pressure on the Contact Points.
2. Hold the leash and the Remote Transmitter in one hand, keep your other hand
free to guide your pet into a “Sit” position.
3. Press and hold your stimulation button, be it shock, vibration or beep.
4. Immediately give the “Sit” command while holding down your desired stimulation
button.
5. Release the stimulation as soon as your dog sits and then give him praise.
6. Release your dog from the “Sit” command and play.
7. Repeat Steps 2 through 6.
The “Come” Command
1. Put a separate, non-metallic collar on your pet's neck ABOVE the Receiver
Collar, and attach a 10-foot leash. Note: Be sure the extra collar does not put
pressure on the Contact Points.
2. Hold your leash in one hand and the Remote Transmitter in the other.
3. Wait for your pet to walk away from you. Once he's far enough away, press and
hold the Stimulation Button (shock, vibration or beep) on your Remote Transmitter.
4. Immediately give the command “Come” while continuing to hold your Stimulation
Button.
5. Using the leash, gently guide your pet toward you until he begins to come in
your direction.
6. Immediately release the Stimulation Button as soon as your pet steps towards
you, and praise him enthusiastically.
7. Quickly move backwards as your pet begins to come back to you, praising him
the entire time.
8. Praise your pet when he returns to you.
9. Repeat Steps 3 through 8.
10. Once your pet responds readily to the “Come” command several times, back
away from him without giving a command. When your pet turns toward you,
give the command “Come” (WITHOUT STIMULATION) and praise him while
you continue to back up. Praise your pet when he returns to you.
11. Use your leash to prevent your pet from running past you. If your pet manages
to run past you, repeat Steps 3 through 8.
The “Stay” Command
1. Put a separate, non-metallic collar on your pet's neck ABOVE the Receiver
Collar, and attach a 10-foot leash. Note: Be sure the extra collar does not put
pressure on the Contact Points.
2. Put your pet on his bed. Hold your leash in one hand and the Remote Transmitter
in the other.
3. Staying within 3 feet, walk the perimeter of the bed. Do not say anything to your
pet.
4. If your pet tries to leave the bed, press and hold the Stimulation Button and give
the “Stay” command. Continue to hold the button until your pet is back on his
bed. If necessary, use the leash to guide your pet onto his place.
5. Praise your pet when he is back on his bed.
6. Once your pet has settled for a few seconds, release him and play calmly.
7. Repeat steps 1 through 5.
Eliminating Unwanted Behavior
Jumping Up
Pets typically jump up to get attention. If you do not want your pet to jump on you,
then friends or members of the family should not encourage this behavior. That
means ev er y ti me y our pet jumps o n so me on e, h e should be r ep ri ma nd ed o r
redirected to an alternate and acceptable behavior, for which he can receive praise.
Note: It is best if your pet first understands the “Sit” command.
1. As soon as your pet lifts his paws off the ground to jump on you, press the
Stimulation Button and give the command “Sit.”
2. Release the Stimulation Button immediately once your pet is sitting, and verbally
praise him.
3. If your pet ignores the stimulation, increase the Intensity Level until he/she
responds.
4. Practice this exercise in several different areas and use different people for
distractions.
-1-
-2-
