
All contents in this manual are copyrighted by JAVAD GNSS.
All rights reserved. The information contained herein may not be used, accessed, copied,
stored, displayed, sold, modified, published, or distributed, or otherwise reproduced without express
written consent from JAVAD GNSS.
JAVAD Mobile Tools
For iOS
Software manual
Version 2.0
Last Revised June 8, 2016
www.javad.com 3
JAVAD Mobile Tools for iOS
System Overview
Javad Mobile Tools (further JMT) is an application for Apple iOS based
devices (iPhone, iPad, iPod Touch) designed to manage the JAVAD GNSS
receivers’ hardware, for post-processing survey using NGS OPUS service
and JAVAD DPOS. It allows conguring RTK base and rover and do-
ing the simple RTK data collection and stakeout with coordinate system
computation and organizing your data. It can be connected to the GNSS
receivers via Bluetooth, WiFi or connected to network (TRIUMPH-2 and
TRIUMPH-1M).
Installation
The JMT software can be purchased and installed from AppStore follow-
ing the link:
https://itunes.apple.com/us/app/javad-mobile-tools-
for-iphone/id820905583?mt=8
Once purchased it can be installed on all iPhone/iPad devices working
with the same Apple ID.
Screen anatomy
There is the navigation bar on the top of each page. It shows current screen
name (in the center) and the action buttons (on the right, if available), and
the name of the previous screen (on the left). To return to the previous
screen, tap this screen name.
Figure 1. Navigation bar
There is a status bar with information about the connected receiver under
the navigation bar on some screens. Here you can check the solution type
(xed, oat, DGPS, or standalone) and accuracy, number of the satellites
(GPS+GLONASS), the corrections quality in percentage and the delay
(with source and type), the raw le logging with receiver le name if re-
cording, the receiver battery status, etc.
Figure 2. Status bar
There is the connection/disconnection button on the top of the screen.
There are the tabs on each screen bottom to organize the user interface in
several page groups. The user can switch from one page group to another
by tapping on the icon on the tab bar:
4 www.javad.com
Figure 3. Tab bar
The following tabs are available:
• Connection – to establish the connection with a JAVAD GNSS re-
ceiver and start any kind of surveying task, including Post-Processing
surveying, RTK Base start or RTK Rover for survey and stakeout.
• Sats – shows the list of satellites and sky plot. Visible satellite systems
can be set up with Settings in the Settings for JAVAD application.
• Files – to handle the raw data receiver les. You can download the
les to controller or delete them to save the space on the receiver.
• File on the iPhone – shows the list of downloaded les. The les can
be processed with NSG OPUS and JAVAD DPOS. Or shared with any
other application.
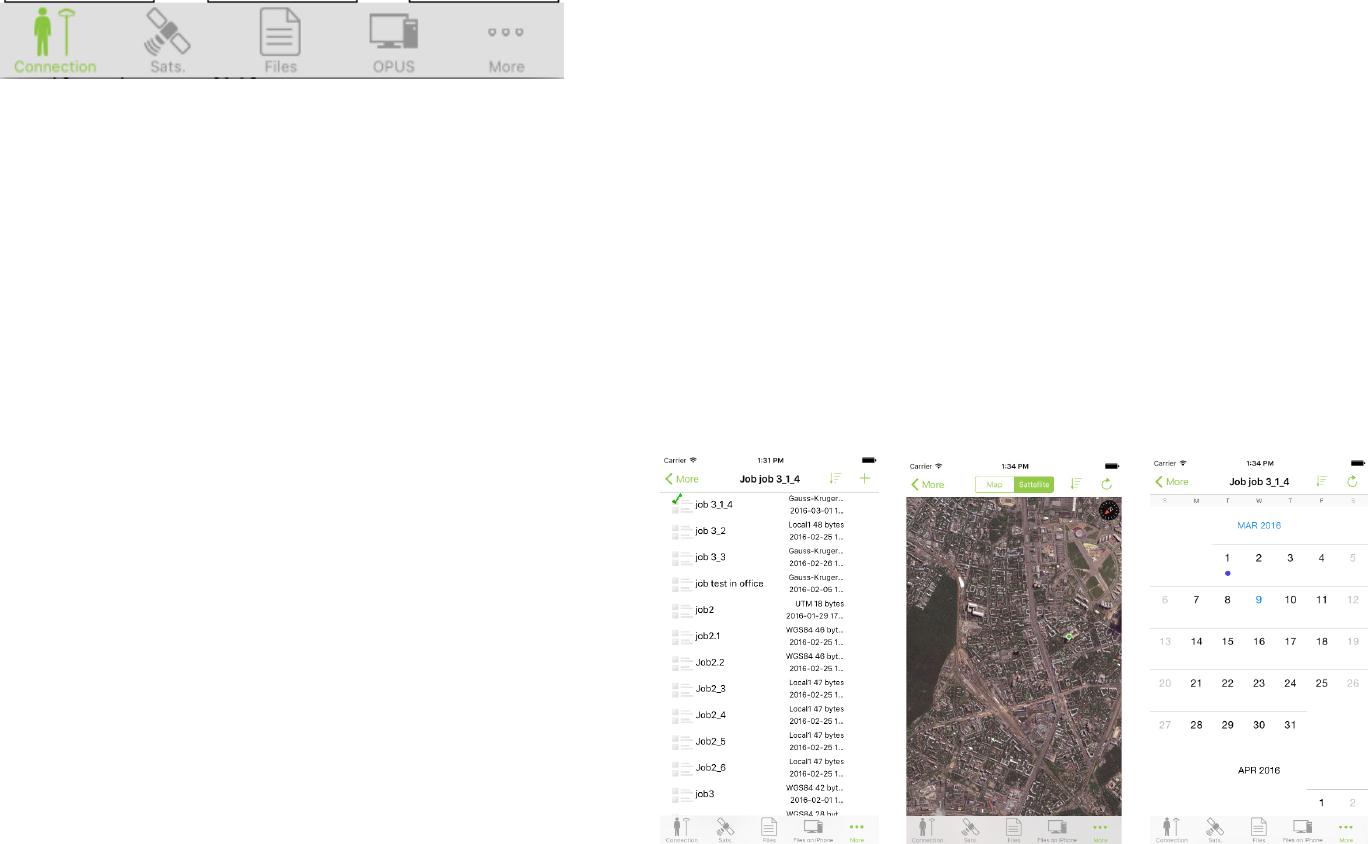
• Job – shows the list of jobs on the iPhone/iPad.
• Survey Points – shows all surveyed points. They can be viewed with
list, on map or with calendar.
• Design points – shows all points to be staked out. They can be viewed
with list and on map.
• Catalog – opens control points organized into catalogs. They can be
viewed with list and on map.
• Map – allows viewing the collected data on map the, combining the
data to the complex objects, and making the simple computations.
• Calibrate – (available only for TRIUMPH-2 and TRIUMPH-1M re-
ceivers with internal levels and compass) – allows calibrating teh inter-
nal compass and levels.
• Exchange servers – controls the built-in FTP server and JustinLink
exchange server.
Data organization
Jobs
At start-up the JMT software opens the last saved job.
The job is a set of data related to one project. It is a folder with data stored
inside your iPhone/iPad. The database with all survey info is located there.
All raw jps les and all other les are stored in this folder.
You can move or backup all data related to the job just by moving or copy-
ing the job folder using iTunes application.
To manage the job, select Jobs item on the tab bar and the list of jobs ap-
pears. Use the lter to search the job: order jobs by name, date, size and
coordinate system. Also you can see the stored jobs on the map and on the
calendar.
Figure 4. List of jobs, the jobs on the map and on the calendar
Deleted job(s) will be moved to the
Trash
sub-folder from the
Documents
folder.

www.javad.com 5
Points
The same way as the jobs the points can be managed. Tap the Survey
Points or Design Points item to see the list of points, and sort them using
the lter.
Figure 5. Survey and Design points menu items
You can create new design points or edit the existing.
For survey points you can edit the name, comment and code, or change
antenna type and height (that cause coordinate recompilation).
Also you can export all types of points to custom format text le and im-
port design and control points from the custom format text les.
Catalogs
The control points are job independent and are organized in catalogs. Each
catalog has its own coordinate system and all points in the catalog are in
the same coordinate system.
The same options are available for catalogs as for jobs and points. Select
Catalog to see the control points in the list or on the map. Here the control
points can be created, edited or deleted. In addition, you can create a new
catalog or switch to another catalog, and delete a whole catalog as well.
While creating a new catalog the coordinate system can be set. All points
in one catalog are always in the same coordinate system.
Receiver connection types and
reprogramming
There are several ways to connect your iPhone/iPad device to your GNSS
receiver. It can be:
1. The JAVAD receiver device is Mobile Hot Spot in AdHoc mode for the
iPhone/iPad connection.
2. The iPad/iPhone and the receiver are connected to the same WiFi
Access Point (to a mobile WiFi router or an ofce WiFi access point).
3. Internet connection to the remote receiver
The WiFi connection requests the receiver conguration. By default
TRIUMPH-2 receiver is congured to AdHoc mode to be accessible with
iPhone/iPad. If the receiver settings are wrong, as well for TRIUMPH-1
receiver initial conguration is required. You can congure the receiver
using NetView software or the scripts below.
Variant 1. Receiver in AdHoc mode
To congure your TRIUMPH-2’s WiFi as access point (“adhoc” mode),
perorm the following steps:
• Check rmware version. It should be 3.6 or newer;
• Send the following commands (use JTerm terminal or NetView):
%01%set,/par/net/tcp/port,8002
%02%set,/par/net/passwd,”1234”
%03%set,/par/net/wlan/ap/ssid,”TRIUMPH2_008”
%04%set,/par/net/wlan/ap/id,”00:00:00:00:00:00”
%05%set,/par/net/wlan/ap/mode,”wpa”
%06%set,/par/net/wlan/ap/passphrase,”1234”
%07%set,/par/net/wlan/ip/addr,192.168.0.1
%08%set,/par/net/wlan/ip/gw,192.168.0.1
%09%set,/par/net/wlan/ip/mask,255.255.255.0
%10%set,/par/net/dhcp/clent/mode,off
%11%set,/par/net/dhcp/server/mode,on
%12%set,/par/net/wlan/mode,adhoc
%13%set,reset,yes
6 www.javad.com
Note: “
TRIUMPH2_008
” is the WiFi network name and “
1234
” is the password.
You can set your own name and password. The last command resets receiver to save and
apply the settings.
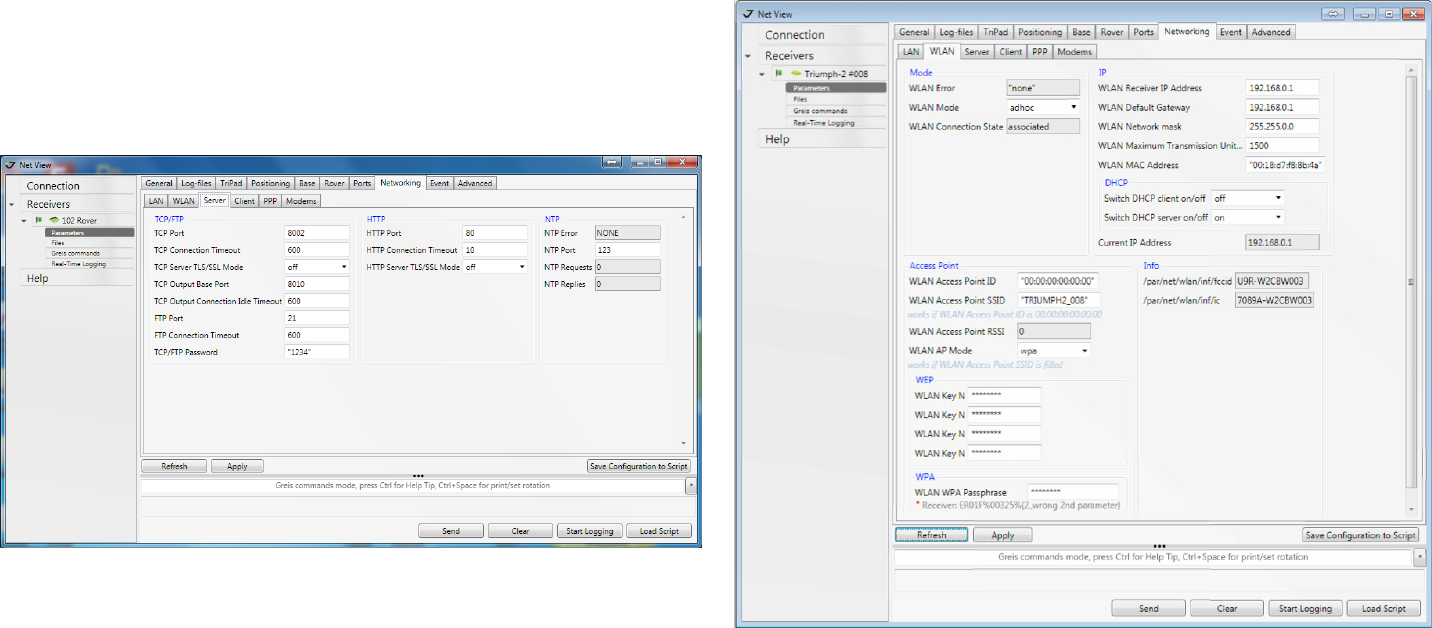
• Use the NetView software to connect to the receiver and switch to
Parameters to set up Networking4WLAN settings: to congure access
to the TRIUMPH-2 set the TCP Port and TCP/FTP Password:
Figure 4. NetView - Networking - Server
• Click Apply and switch to Networking4WLAN and enter the follow-
ing:
WLAN Access Point SSID: name
WLAN AP Mode: wap
WLAN Receiver IP Address: 192.168.0.1 (or any other
internal correct)
WLAN Default Gateway: 192.168.0.1 (the same as
Receiver IP)
Switch DHCP client on/off: off
Switch DHCP server on/off: on
WLAN Mode: adhoc
Figure 5. NetView - Networking - WLAN
• Click Apply. NetView resets the receiver to apply the settings.
• Check that Current IP Address is appeared.
Now the receiver is ready for connection with your iPhone/iPad.
On the iPhone/iPad open the Settings4WiFi to see the list of available
WiFi networks.

www.javad.com 7
Figure 6. Steps to connect the iPhone to the JAVAD GNSS receiver in
AdHoc mode
In the Devices section your receiver name should appear. Tap to select it.
You will be warned that the device doesn’t have the access to the Internet.
Tap near the WiFi name to check an IP address is assigned correctly
and see the Router IP. Remember it.
Figure 7. Information about the receiver’s WiFi
Run the JMT application and tap the Set Default button to set the default
connection parameters:
IP Address: 192.168.0.1, Port: 8002,
Password: 1234
The receiver will be connected automatically.
Figure 8. Connection screen
The receiver will be connected automatically.
Variant 2. Receiver and iPhone/iPad in the same WiFi network
(in office or with an external Mobile Access Point)
• Send the following commands (use JTerm terminal or NetView):
%01%set,/par/net/tcp/port,8002
%02%set,/par/net/passwd,”1234”
%03%set,/par/net/wlan/ap/ssid,”YOUR_WIFI_NAME”
%04%set,/par/net/wlan/ap/id,”00:00:00:00:00:00”
%05%set,/par/net/wlan/ap/mode,”wpa”
%06%set,/par/net/wlan/ap/passphrase,”YOUR_WIFI_
PASSWORD”
%10%set,/par/net/dhcp/clent/mode,on
%11%set,/par/net/dhcp/server/mode,off
8 www.javad.com
%12%set,/par/net/wlan/mode,on
%13%set,reset,yes
• In the script we suggest that the WiFi works in DHCP mode and auto-
matically assigns IP addresses. Also we suggest it uses WPA encryption
so you should set name of the WiFi network and its password. The last
command resets receiver to apply the settings to.
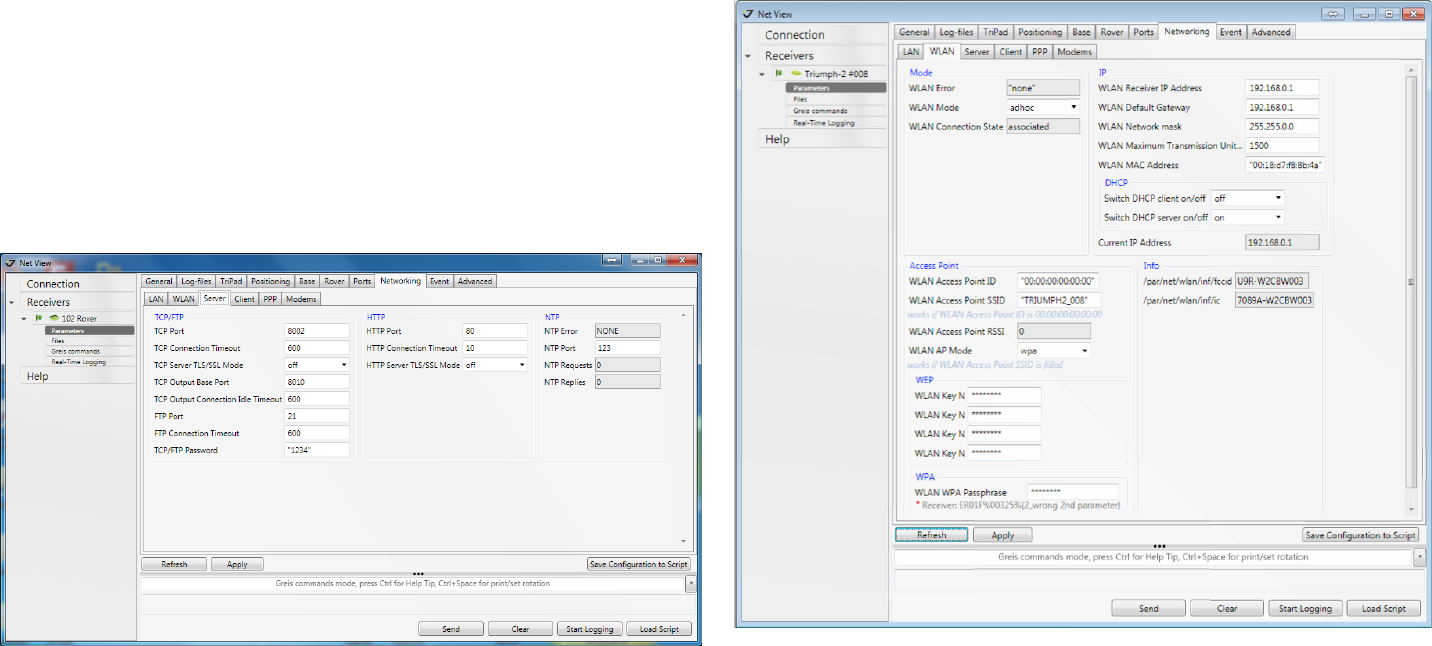
• Use the NetView software to connect to the receiver and switch to
Parameters to set up Networking4WLAN settings: to congure access
to the TRIUMPH-2 set the TCP Port and TCP/FTP Password:
Figure 9. NetView - Networking - Server
• Click Apply and switch to Networking4WLAN and enter the follow-
ing:
WLAN Access Point SSID: your WiFi network name
WLAN AP Mode: wap
WLAN WPA Passphrase: your WiFi network password
Switch DHCP client on/off: on
Switch DHCP server on/off: off
WLAN Mode: on
Figure 10. NetView - Networking - WLAN
• Click Apply. NetView resets the receiver to apply the settings.
• Check that Current IP Address is appeared.
Now the receiver is ready for connection with your iPhone/iPad. C
Connect your iPhone/iPad to the same WiFi network (with the same
Mobile Access Point) using the items Settings4WiFi.
Run the JMT application and tap the Find button to nd the JAVAD GNSS
receivers available in the network.
www.javad.com 9
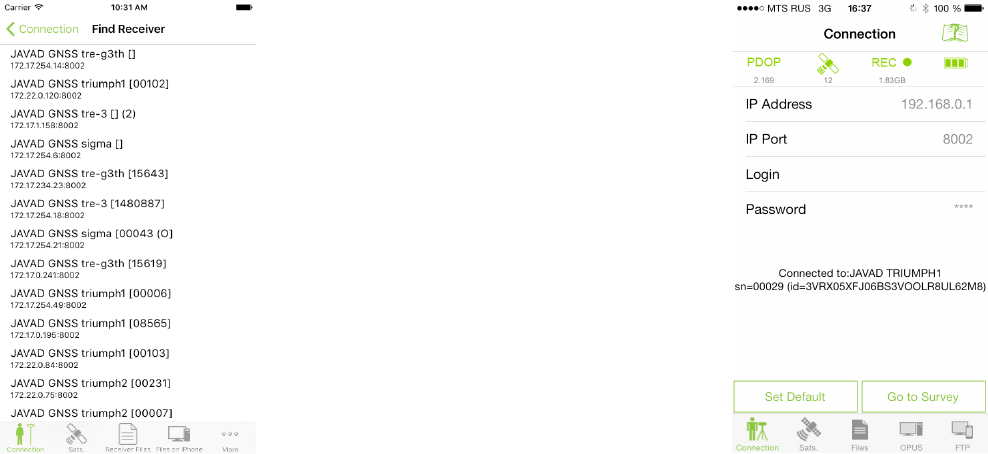
Figure 11. Find receiver screen
Tap to the receiver name to select it. If you can’t nd the receiver, type
its IP address manually. Set the default connection parameters:
Port:
8002, Password: 1234
.
The receiver will be connected automatically.
Figure 12. Connection screen
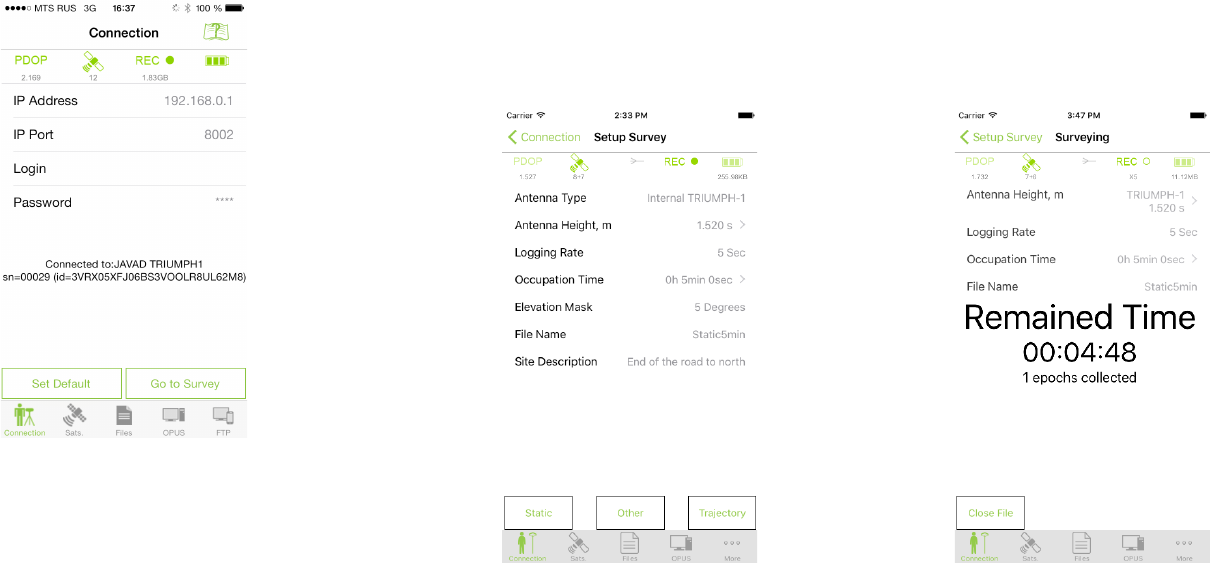
10 www.javad.com
Variant 3. Connection to the remote receiver
The last variant is the connection to the remote receiver. Select the Network
radio button in the connection types.
Type the receiver IP address and port, login and password. After connec-
tion is established, all connection details will be stored and the next time
you can select the connection from the list of connections.
Figure 13. Connection screen
The receiver will be connected automatically.
Post-processing surveying
You can set the name for new receiver raw le, antenna type and height,
occupation time and logging rate, and start the static survey by tapping
Static button. For static survey you should tap antenna button before every
surveying to avoid the surveying with wrong antenna height used in the
previous survey session.
JMT programs your receiver to close the static survey automatically so
you don’t need to monitor the surveying all the time. Although you can see
the surveying status at any time or stop it and close static le if any.
Figure 14. Post processing surveying
The same you can do for Trajectory surveying by tapping the Trajectory
button. During trajectory surveying you can set the event marks inside the
raw le using Event button.
With JMT you can perform the Stop and Go survey. You can survey sev-
eral sites into one receiver le. The length of full survey should be at least
half hour but each point can be limited to one or two minutes of collection.
Tap Stop and Go button and on the next screen you can control the survey-
ing process.
www.javad.com 11
You can start the site surveying with Point button and nish it by tapping
the Point button once again.
You can start trajectory surveying by tapping Trajectory button as well.
Also you can nish one type of surveying and start another just tapping
other button, in other words, you can start trajectory surveying after point
surveying just by tapping the Trajectory button without tapping Point
button. When the stop-and-go survey is done, stop it and close receiver
le using Close File button.
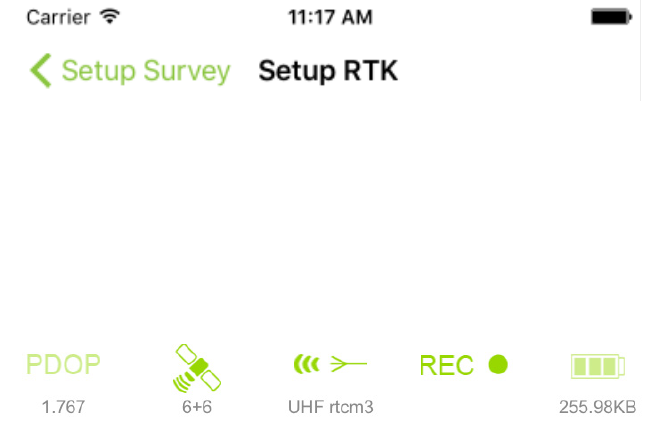
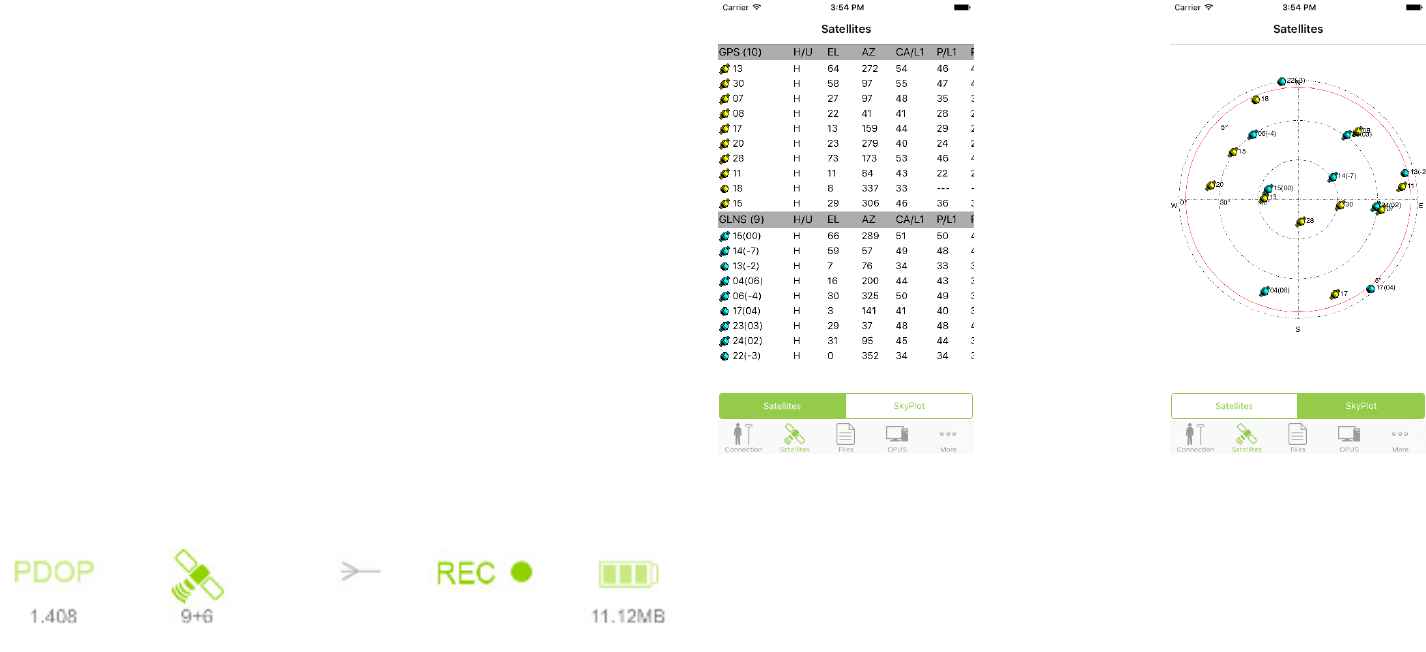
Sky plot
During the survey on the top of the screen the status bar is available. Their
icons and values are:
• precision of current solution;
• current PDOP
• current number of GPS + GLONASS satellites
• REC ashing when raw data logging is on with le name
• receiver battery status and receiver raw data free memory size
Figure 15. Status bar in post-processing survey mode
By tapping to the satellite numbers on the status bar you can switch to the
Satellites list and sky plot.
Each concentric circle represents the elevation angle above the horizon.
The outermost circle corresponds to 0 degrees above the horizon. The cen-
ter of the sky plot represents 90 degrees above the horizon. The satellite
markers for different systems are shown by the different colors. The de-
gree of lling of marker reects the value of the signal-to-noise ratio.
Figure 16. Sky plot and satellites table
Settings
User can congure satellite table and sky plot with Settings. Go to Home
of your iPhone/iPad and to Settings. There nd JAVAD item and you can
see JMT settings. There you can select Satellite section to congure visible
satellites systems.
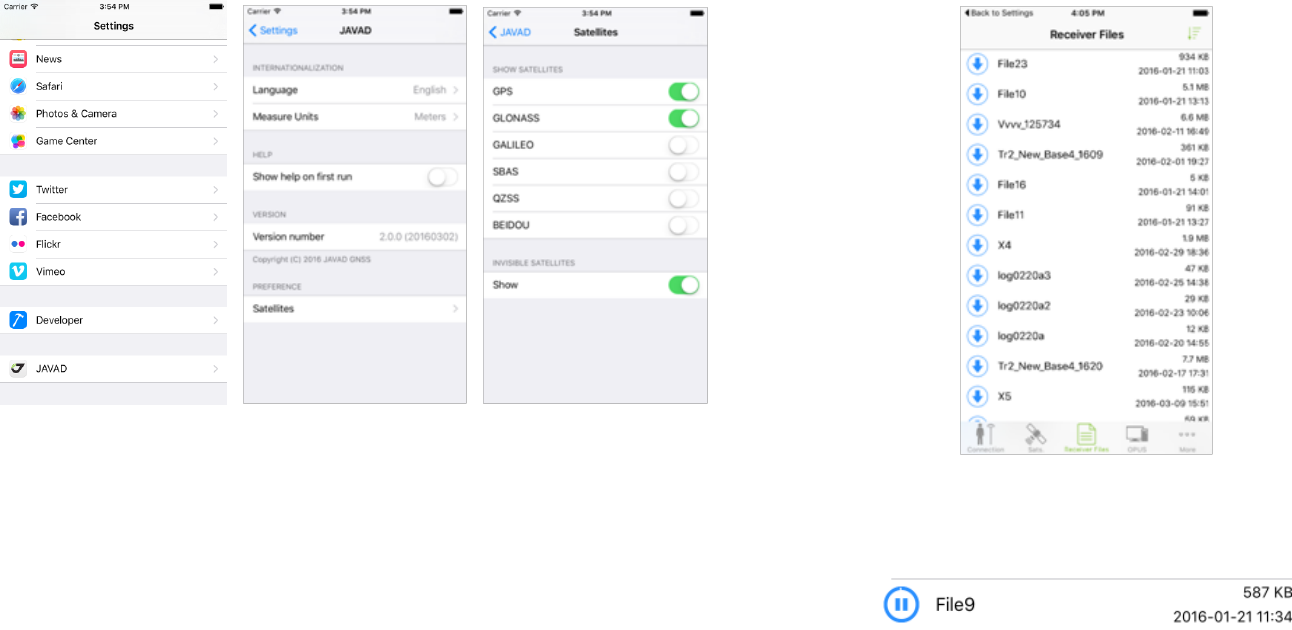
12 www.javad.com
Figure 17. JMT Setting screens
Receiver file management
After surveying you can handle the receiver les by selecting the Receiver
Files item. There you can see the list of the les. You can also see the les
on the map or calendar. You can sort and search them the same way as in
other lists (jobs, points, catalogs etc).
Figure 18. File list
By tapping on the icon near to the le name you will see the menu-list of
actions for the receiver le. Select to delete or download the le.
Figure 19. Downloading progress
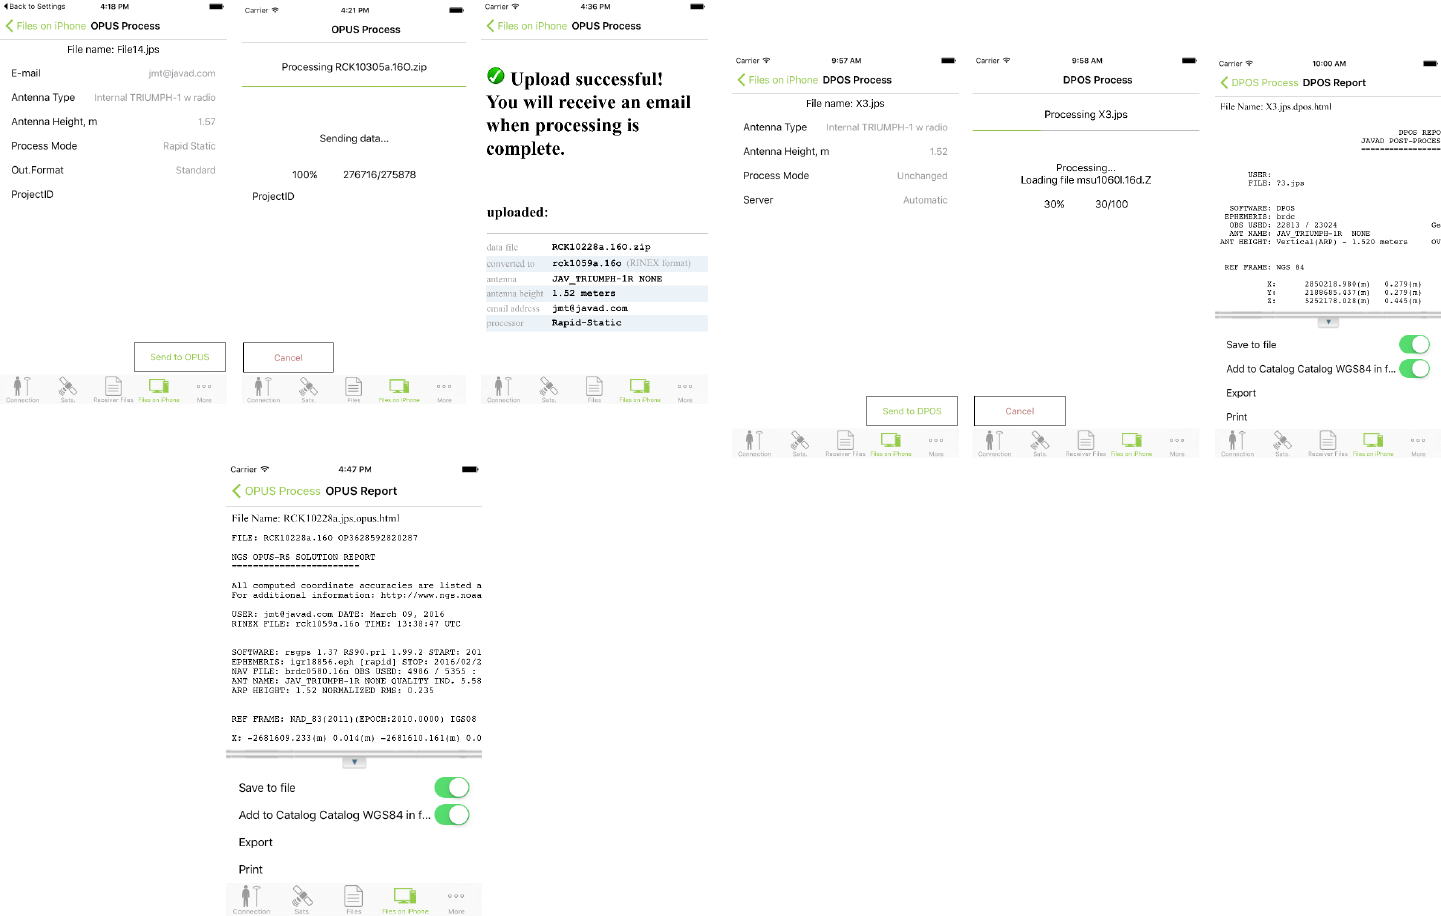
Opus and DPOS processing
After the le(s) has been downloaded to the controller you can process jps
les to compute coordinates using NGS OPUS (works only in USA) or
JAVAD DPOS (works in USA, where DPOS servers are installed).
Select Files on iPhone page on the tab bar and the list of downloaded les
appears. The les can be arranged the same ways as described above for
other lists: they can be sort using the list, map and calendar.
To operate with a le, slide a le item from right to left. The list of com-
mands appears. You can delete the le, export it or process it with OPUS
or with DPOS.

www.javad.com 13
Figure 20. What to do with the file
Tap Process OPUS. The JMT software tries to read the antenna model and
its height from the le and convert the parameters to the vertical height.
Note: OPUS doesn’t support the slant heights.
Enter the antenna height manually if needed.
Select Rapid Static (less than 2 hours) or full Static (greater than 2 hours).
Set Project Id to use the le in OPUS Project processing.
Enter an e-mail address to receive the results from OPUS.
If you enter
,
JMT will receive automatically the an-
swer and deliver it to your Android device when ready.
Figure 21. OPUS process
Tap Send to OPUS and the progress dialog appears and after that the dialog
window with the result appears. You can close it, if you set
jmt@javad.
com
. After some minutes JMT reads the answer and shows the result. The
result can be stored as text le. Select the check mark Save Report to save.
Additionally, JMT can extract the coordinates from the le and add them
to the catalog with WGS84 coordinate system, if Add to Catalog is tapped.
14 www.javad.com
Figure 22. OPUS processing
Figure 23. OPUS processing result
The same steps as described for OPUS can be performed for JAVAD DPOS
processing. The result will be ready immediately after the processing. You
can save the result to the le or add the result coordinates to the catalog.
The report can be seen at any time by clicking the processed le in the list
of le.
Figure 24. Figure 22. DPOS processing
RTK works
The JMT software allows operating JAVAD GNSS receivers in RTK mode.
It is possible to con- gure the receiver as an RTK Base or as an RTK rover
for RTK Survey or RTK Stakeout. Some steps should be performed before
start. You need to create a job and set the coordinate system with height
system and localization, then congure your receivers as an RTK Base and
an RTK rover with required correction source.
Bellow you will nd the detailed description.
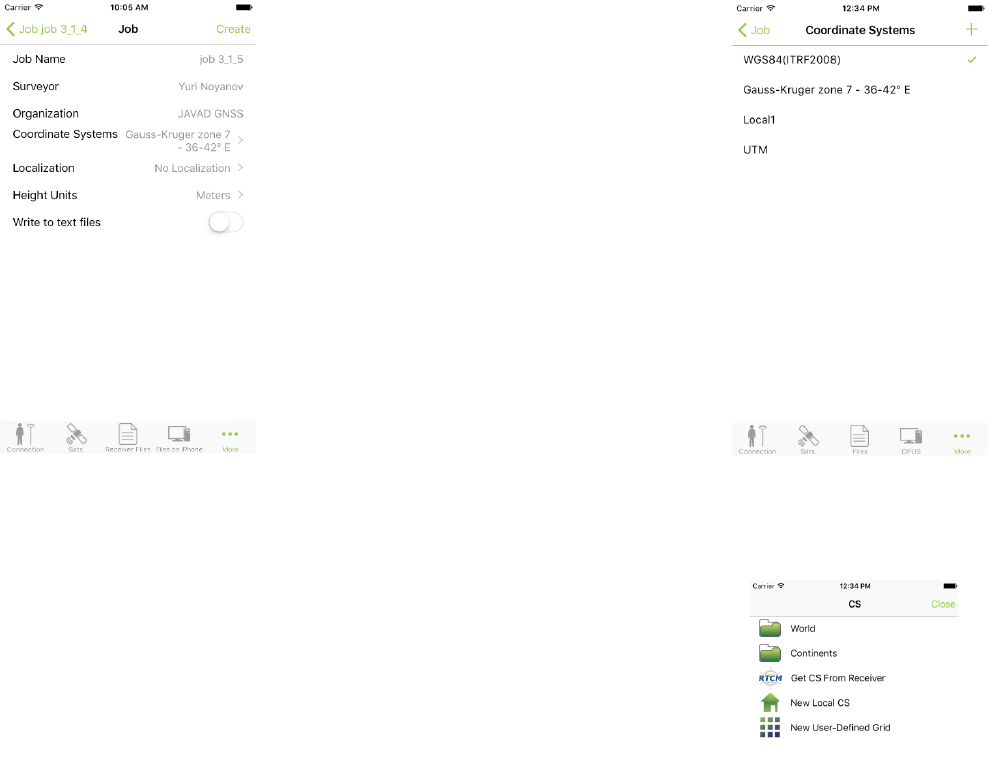
How to create a Job
To create a new job, use Job page on the tab bar. Tap the + button. New
job screen appears.
www.javad.com 15
Figure 25. New Job
Enter the job name and information about the job:
• surveyor and organization names
• measure units for displaying
Activate Write to text les check mark to save the information to the text
les in addition to the job database.
Note: This feature can be useful, but it makes the work slightly slower. It is possible to
activate or disable the mark at any time further. Additionally, you can modify the job
name and surveyor / organization names later with Edit command.
Coordinate systems, units and localization
Set the coordinate system for the job. Tap the button with coordinate sys-
tem name and you will switch to Coordinate system favorites dialog. It
shows your frequently used coordinate system. Select the coordinate sys-
tem from the favorites list.
All favorites coordinate systems are stored in
CSFavorites
sub-folder.
Some their binary les are stored in
GeoData
folder.
Figure 26. Coordinate System favorites
To dene a new coordinate system, tap + button on the top. The list of available
coordinate systems appears.
Figure 27. Coordinate system
It provides several possibilities:
• select a predened coordinate system from the database;
• add a local system (and later make the localization after surveying
several points);
• add the user dened system with all parameters (ellipsoid, datum,
projection).
16 www.javad.com
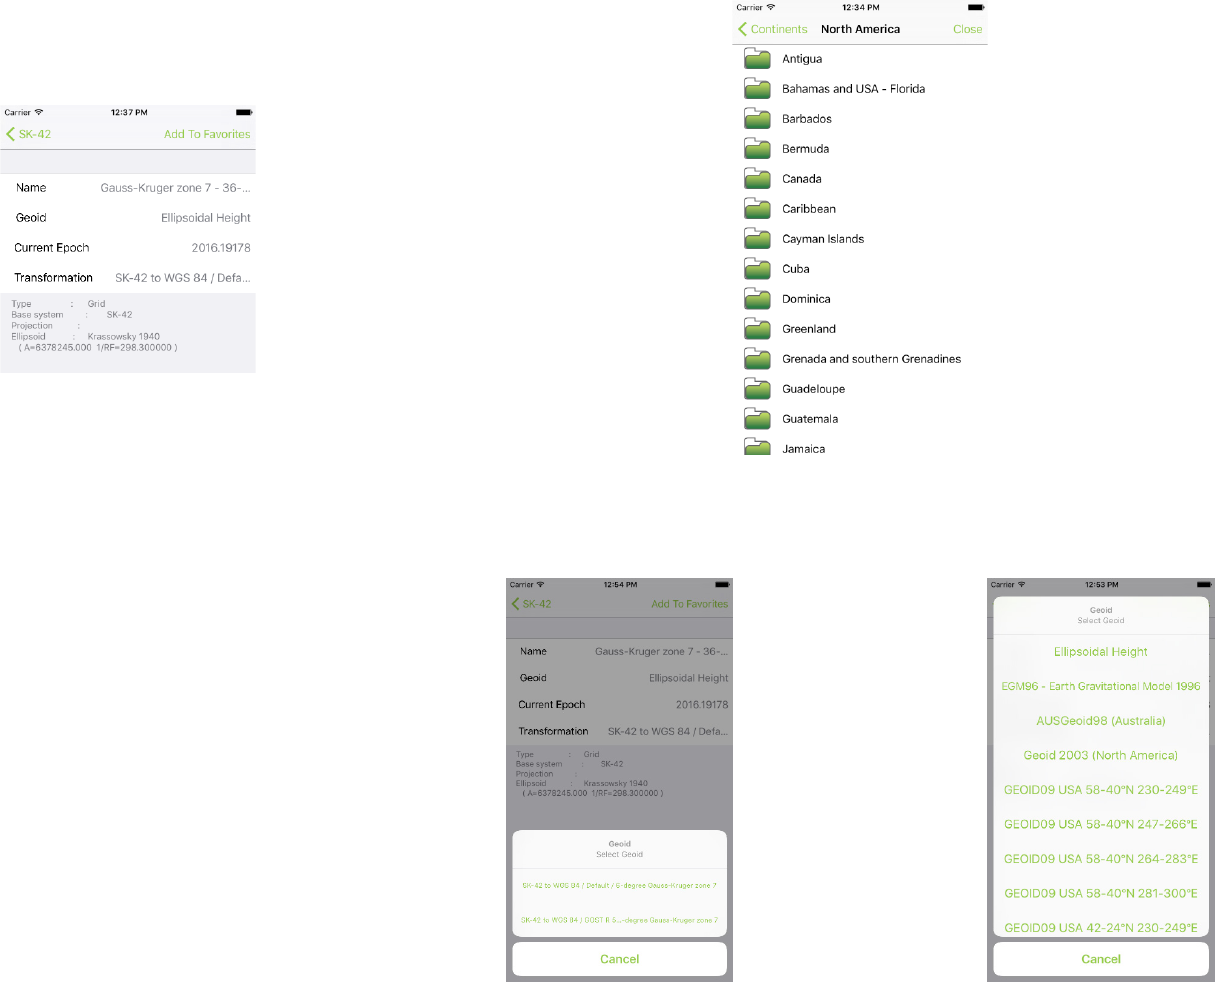
Predefined coordinate system
Select the World or Continents items to select the coordinate system from
the world or from the country specic group.
Figure 28. Predefined coordinate system
Go through the tree of grouped coordinate systems and nd the required
one and tap it.
A new screen with parameters of the coordinate system appears.
Enter the name for the selected system, select the height type or geoid type
(or remain the ellipsoidal height) and select the appropriate transformation
if several transformations are available.
Figure 29. Coordinate systems tree
Tap Geoid to set the height system and tap Transformation to select the
transformation.
Figure 30. Transformation and geoid selection
Figure 28. Transformation and geoid s e l e c t i o n
www.javad.com 17
Finally tap Add CS to favorites button to add the coordinate system to the
favorites list.
Figure 31. Add to favorites
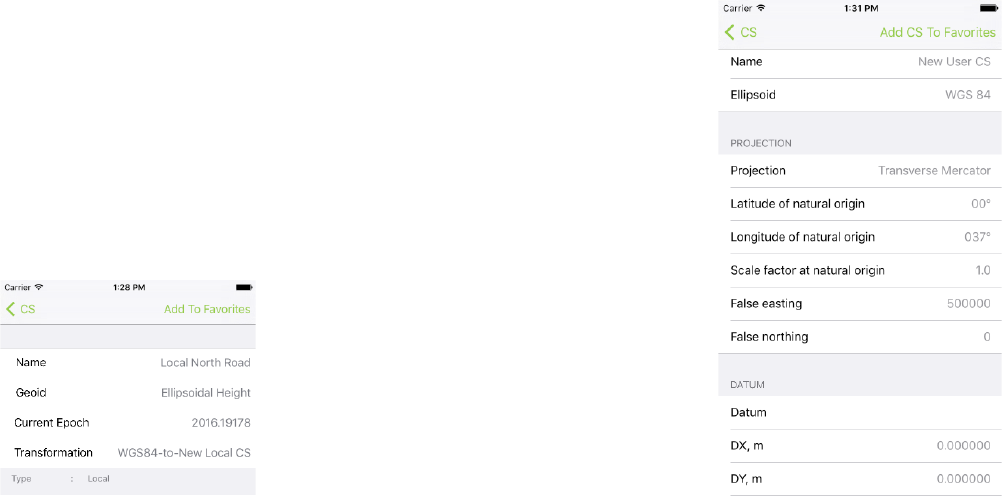
New Local system
To enter a new local coordinate system, use New Local CS item.
Enter the name of the coordinate system and tap Add CS to favorites to
nish.
Figure 32. New local coordinate system
The localization procedure for the coordinate system can be done later
from the Job dialog.
User defined grid system
Figure 33. User defined grid system
Select New User-Dened Grid and enter the grid parameters.
Enter the following parameters for the system:
• name for the coordinate system;
• ellipsoid;
• projection type;
• projection parameters (the parameters depends on projection type);
• 7 datum parameters (3 offsets, 3 rotation and scale) - you can type it
manually or select from the list of existing datums;
• datum direction (WGS84 to the CS or from this CS to WGS84);
• select geoid (or remain ellipsoidal);
Tap Add CS to favorites button to add the coordinate system to the favor-
ites list.
18 www.javad.com
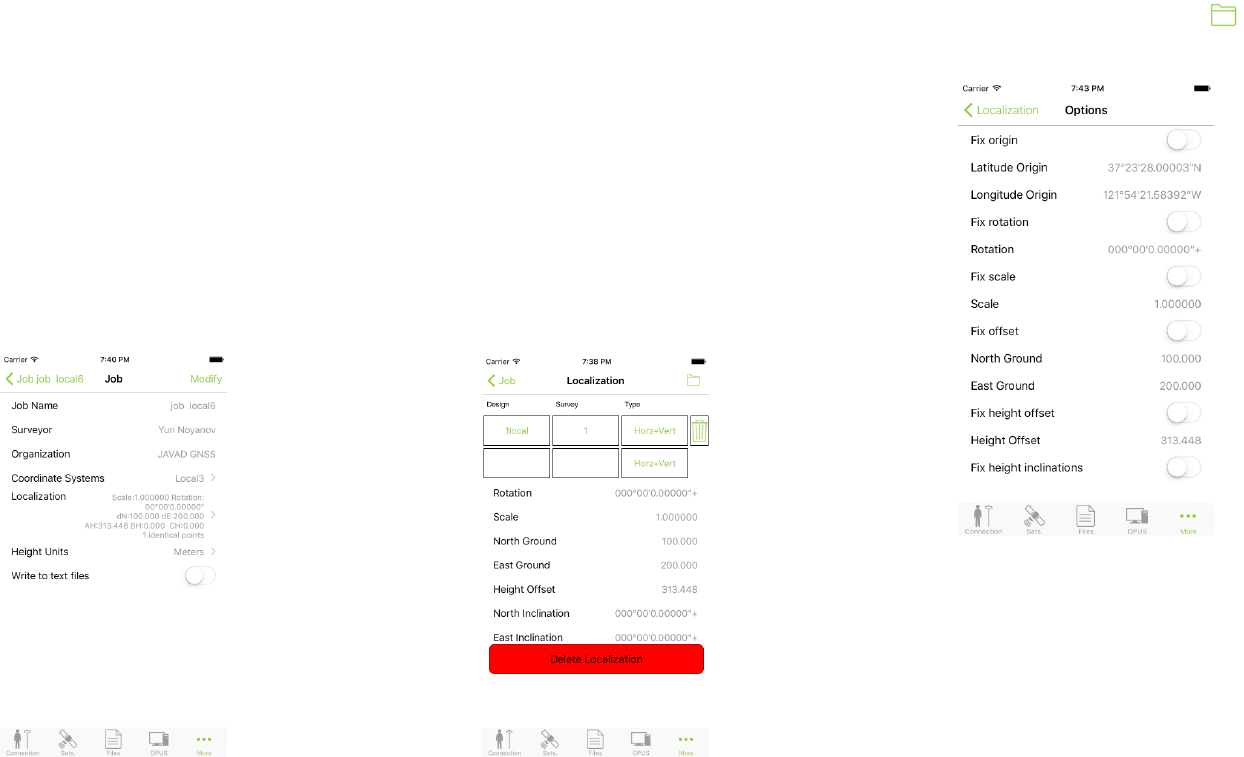
Localization
Sometime you may need to match the coordinate system with your coordi-
nates. This can be performed with the localization. The localization allows
calculating the local transformation parameters between two coordinate
systems, dened by the sets of points with coordinates known in these
systems.
Dene the set of points in your coordinates and in coordinates in the
known coordinate system.
You can use the surveyed coordinates and design the coordinates from the
catalog. The JMT software computes transformations using 4 horizontals
and 3 vertical parameters:
• rotation, scale, offset x, offset y;
• delta height, x inclination, y inclination;
• (if surveyed points are used latitude0 and longitude0 as parameters
for oblique stereographic projection parameters).
You can type the parameters manually, but alternatively you can use the
identical points. Identical points dialog shows the list of pairs of designed
and surveyed points. To add a new pair tap + button on the top of the list.
Figure 34. Localization
To select or modify the surveyed or designed point, tap the button in the
identical point line. To delete an identical point tap the trash bin button on the
right.
The identical point can be for plain and height parameter computation only
or for plane parameters computation or for height parameters only. You
can check this using drop-down menu near each identical point.
Also you can see the residuals for each identical point. The large residuals
in localization means an error.
You can set some parameters for the localization manually, e.g. set rotation
zero or scale equal to 1.0. To do this press button on the top right cor-
ner. The following screen appears:
Figure 35. Localization parameters
Enable the parameters you want to x and their corresponding values.
After you apply the parameters, the JMT software modies the coordinate
system script in the job with the localization. You can perform the local-
ization several times to make it more precision with adding the additional
identical points.
Note: The localization item is unavailable when you are creating a new job. Selected
Edit job command, to perform the localization and you won’t be able to modify the job
coordinate system.
www.javad.com 19
Geoids
The JMT software uses the plane and height coordinate system simultane-
ously. Dene the height type and geoid when you are preparing the coor-
dinate system for favorites list.
If you are selecting the geodetic or grid system, the geoid selection is
available. Dene the user-dened grid system.
The geoid binary les can be download from the GeoData server auto-
matically. The binary les for computations should be stored to
javad/
geodata
folder (not to
csfavorites subfolder
!).
Note: If JMT doesn’t load it automatically you should place the les manually in the
folder.
Correction sources
For RTK works you may need to setup your equipment to transmit RTK
correction from RTK Base receiver to RTK Rover. You can pre-congure
your base and rover receivers once and don’t reset them each survey ses-
sion. The internal receiver rmware will congure everything after receiv-
er is turned on.
To congure RTK Base, you need to set the base coordinates or average
them and after the surveying process them using DPOS/OPUS VBRTK
procedure.
You can easily set up your Base and Rover using the JMT software.
There are several correction sources are supported with JMT:
• External radio connected via Bluetooth or internal TRIUMPH-1/M
radio
• UHF radio
• FH radio
• GSM direct call aka CSD (with internal TRIUMPH-1/M GSM radio)
• Internet corrections (with Mobile 3G HotSpot or internal Triumph-1/M
3G radio)
• VRS network with Ntrip or RCV protocol
• RTK Base station with static IP
• NetHub
It is convenient to create the separate correction source items for different
works and select when needed quickly from the list, without retyping all
parameters every session.
To create a new correction style, select new FH radio, new UHF radio,
new NTRIP server, new RCV server, new RCV Base item. New correction
style screen appears, set the settings for the radio, enter the correction
style name to store the conguration in the list of correction sources.
To modify the corrections source settings, tap the button near the descrip-
tion.
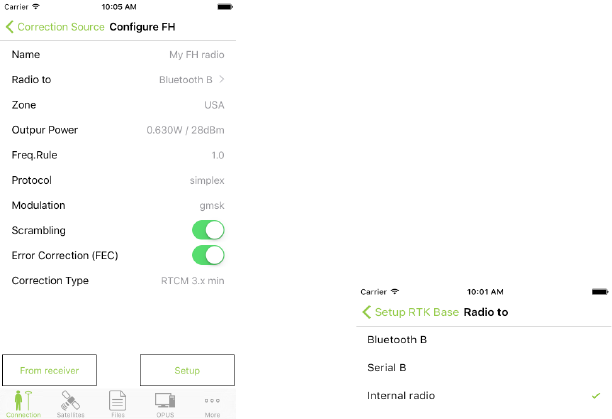
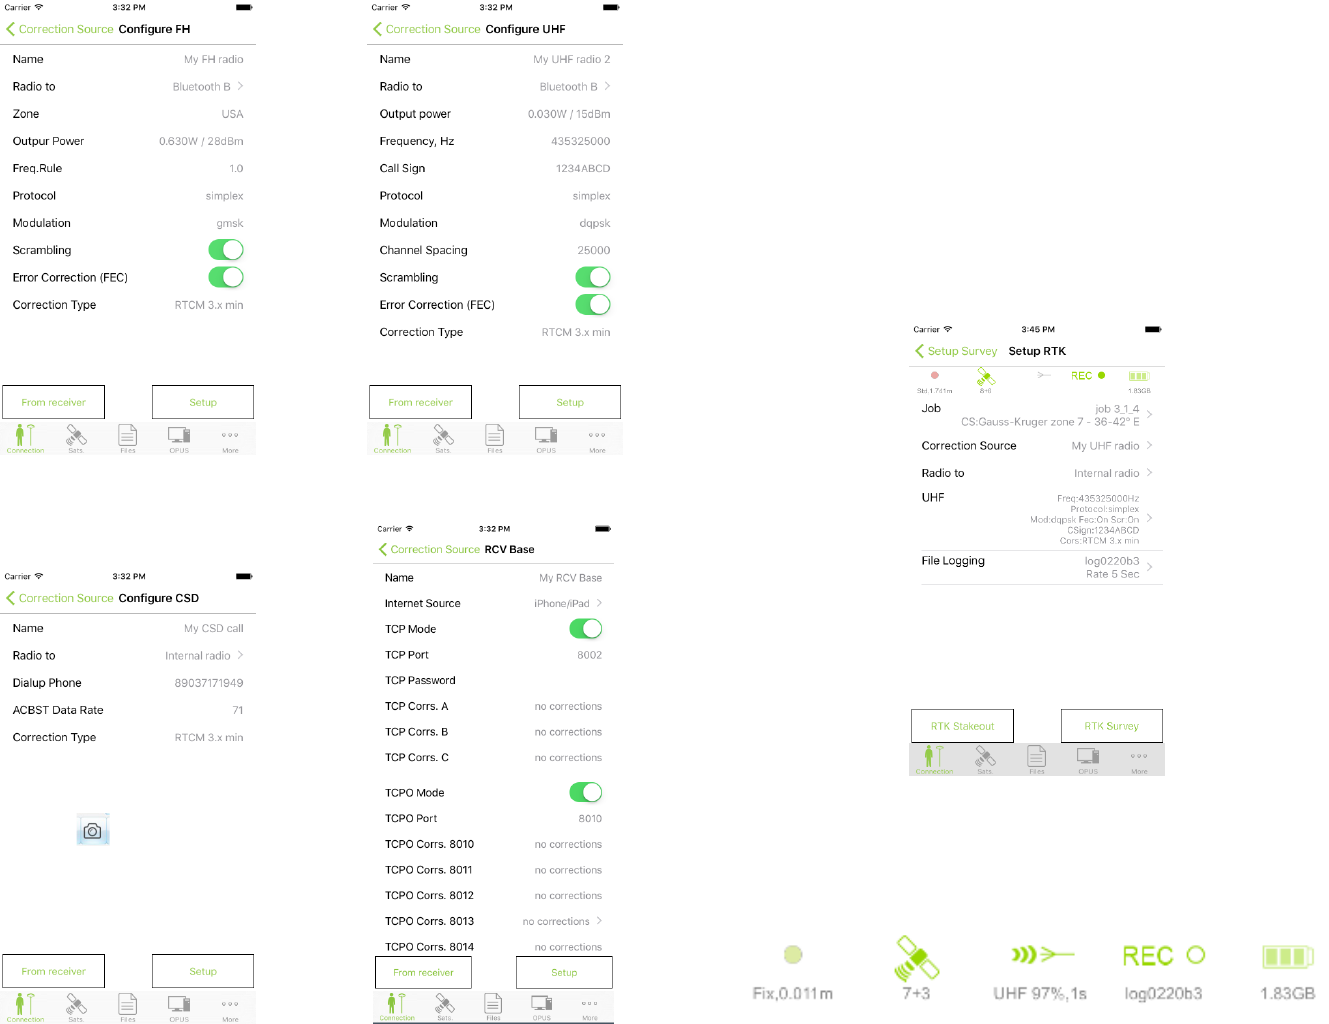
FH Radio
You can set the Rover radio connected to Bluetooth B (for external
Bluetooth radio), Serial B (for external radio connected with cable to port
B of TRIUMPH-1/M), or Internal radio (for internal radio of TRIUMPH-
1/M).
Figure 36. FH radio configuration on the rover side
UHF Radio
You can set the Rover radio connected to Bluetooth B (for external
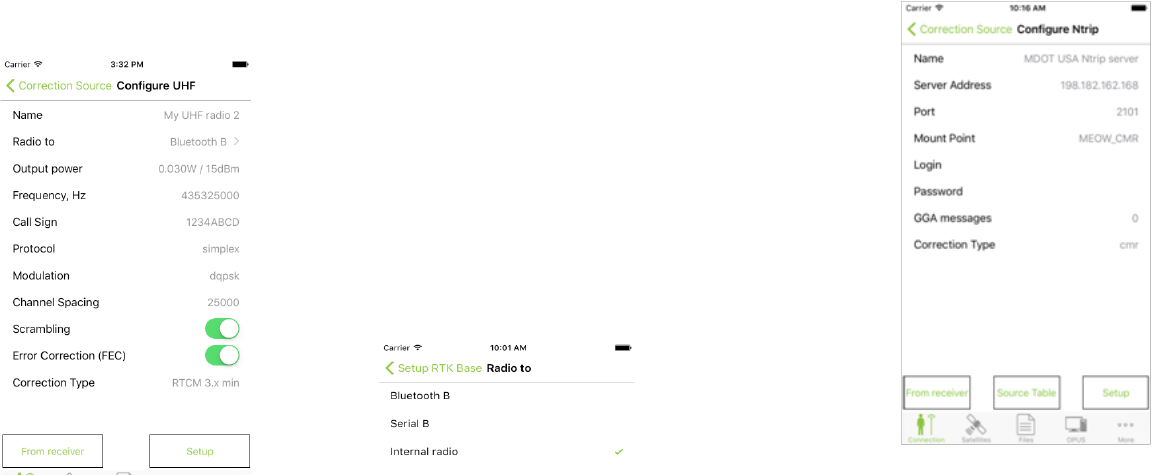
20 www.javad.com
Bluetooth radio), Serial B (for external radio connected with cable to port
B of TRIUMPH-1/M), or Internal radio (for internal radio of TRIUMPH-
1/M).
Figure 37. UHF radio configuration on the rover side
NTRIP server
For the NTRIP rover corrections connect to the network (NetHub, VRS,
FKP etc.) using standard NTRIP protocol. The rover will receive the cor-
rection via Internet.
There are several ways to connect the rover to the Internet:
• the connection is established by Android device using built-in 3G In-
ternet, JMT runs NTRIP client and reads the correction and passes the
corrections to the rover;
• the receiver is connected to 3G WiFi Mobile HotSpot and internal
rmware of the receiver runs NTRIP client and reads the correction;
• the receiver uses internal 3G/GPRS radio to connect to the Internet
and the internal receiver rmware runs NTRIP client and reads the cor-
rections.
Note: To check the Internet connection you can use, tap Internet from drop-down list.
Source Table button downloads the NTRIP source table and displays the
screen to select a mountpoint. All other items are depended on the selected
mountpoint.
Figure 38. NTRIP connection configuration
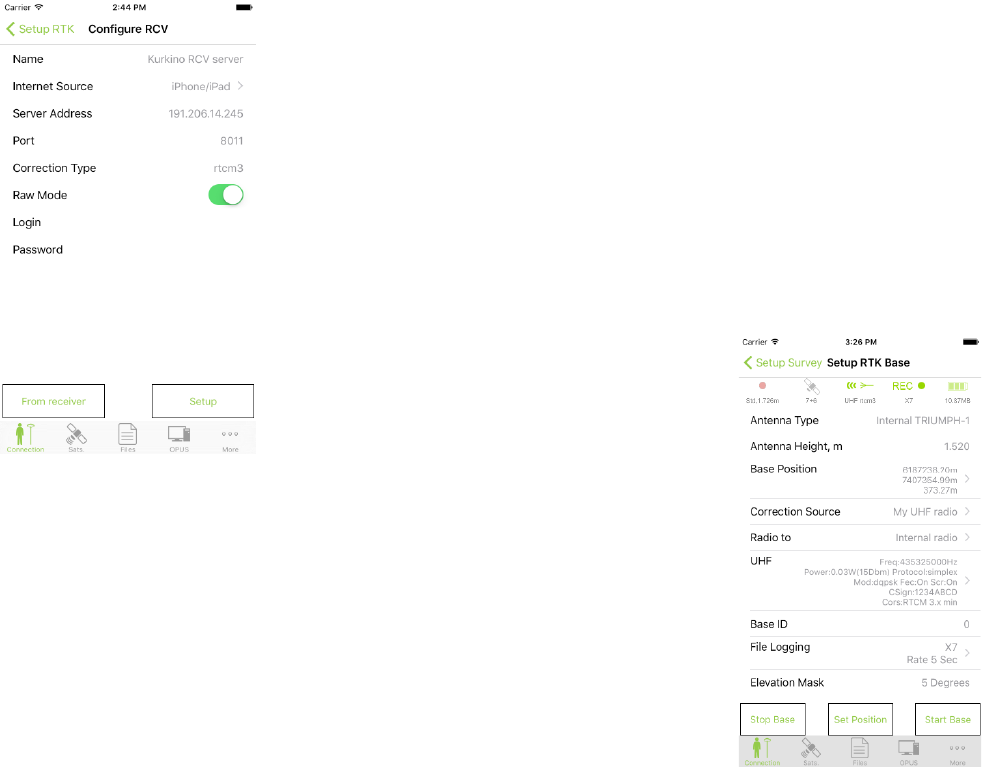
RCV server
For RCV rover corrections go either from a network without a protocol or
from a standalone rtf base receiver with static IP.
RCV can operate in two modes: TCP data ow without authorization (so
called TCPO) or with a login/password authorization (TCP). Number of
connections to one TCPO port is unlimited. 5 different TCPO ports can be
congured for different types of corrections on one base receiver.
One TCP port allows only one connection with login/password. Base re-
ceiver allows up to 5 TCP ports (from TCP A to TCP E).
Note: NetHub software allows more complex conguration. See NetHub user manual for
details.
www.javad.com 21
Figure 39. RCV server configuration
There are several ways to connect the rover to the Internet:
• the connection is established by Android device using built-in 3G In-
ternet, JMT runs NTRIP client and reads the correction and passes the
corrections to the rover;
• the receiver is connected to 3G WiFi Mobile HotSpot and internal
rmware of the receiver runs NTRIP client and reads the correction;
• the receiver uses internal 3G/GPRS radio to connect to the Internet
and the internal receiver rmware runs NTRIP client and reads the cor-
rections.
Note: To check the Internet connection you can use, tap Internet from drop-down list.
RCV Base
If your RTK base station has a static IP you can congure it with following
screen. You can congure the receiver as Internet accessible RTK base sta-
tion with Internet access with this Android device or with internal receiver
rmware using WiFi or internal 3G/GPRS.
Note: In any case the Android device SIM card, 3G WiFi router SIM card or internal 3G/
GPRS radio SIM card should have permanent static IP accessible from Internet for other
rover receivers.
In that case you can set TCP (with authorization) and TCPO (without au-
thorization) ports in the base receiver.
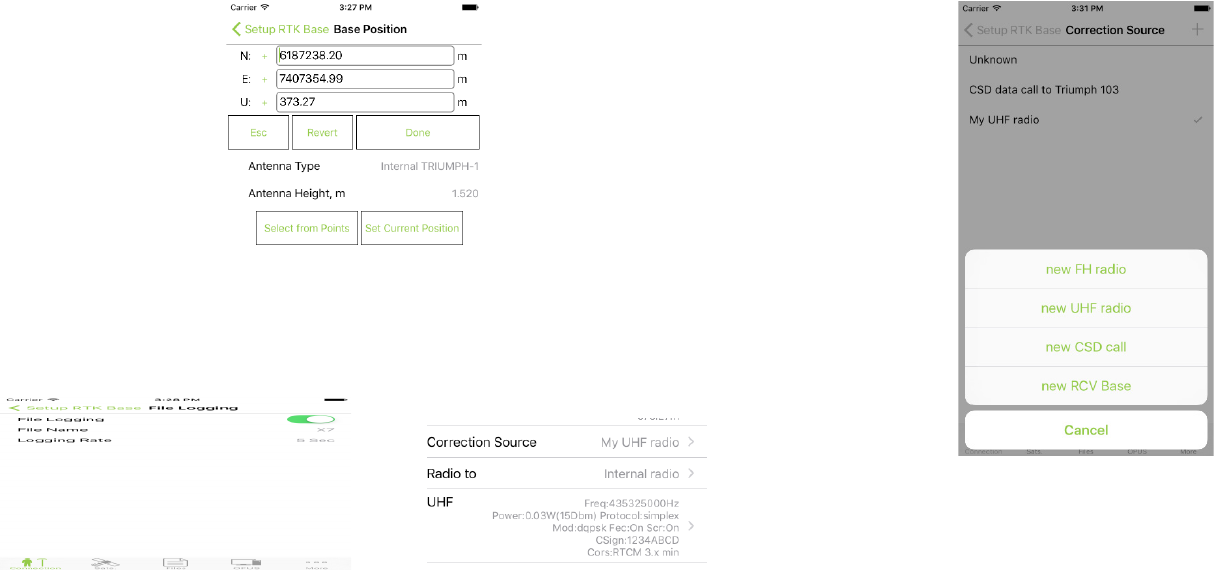
RTK Base start
To start receiver as RTK Base tap RTK Base item on the home screen. RTK
Base screen appears. Enter several settings to start RTK Base:
• station name and id
• antenna type, antenna height and base position
• correction source
• raw le logging
Figure 40. RTK Base Configuration
You don’t need to reset all base station parameters every time, you can just
modify the antenna height and position. When you come to a new base
position, enter the new antenna and new position (either from catalog or
manually) and tap Set Position button. Base station will be ready imme-
diately.
22 www.javad.com
Figure 41. Base position
For full base station reset use Start station button on the bottom.
The raw le logging you can control with following items in the screen:
Figure 42. File recording and Corrections screens
You can create a new correction source settings by selecting new FH ra-
dio, new UHF radio or new RCV Base item in Corrections list.
Figure 43. New correction sources
New correction style screen appears, set the settings for the radio, select
the correction style name to store the conguration in the list of correction
sources. To modify the corrections source settings, tap the button near the
description.
Below are the examples of the different type settings for RTK base.
www.javad.com 23
Figure 44. FH and UHF Radio
Figure 45. CSD CAll and RCV Receiver
RTK rover setup
To congure the RTK rover, select RTK Rover. Here you need to select the
correction source, check/modify correction source parameters. By tapping
Start button congure your receiver as RTK rover.
No need to reset the rover every time before survey. Once congured, the
internal rmware sets all parameters when receiver is turning on. Select
Unknown for Correction Source to skip the receiver reconguration.
If you want to set the different source type or other parameters, or for the
rst time, you need to congure your receiver as rover.
Figure 46. Setup RTK screen
Otherwise select appropriate correction source.
There is the status bar on the top of this screen. This status bar in the RTK
mode is slightly different from post-processing mode.
Figure 47. Status bar in RTK mode
24 www.javad.com
It shows:
• solution type (green means Fixed, orange - Float, red - standalone and
yellow - DGPS) with precision (HRMS) value text;
• number of satellites GPS+GLONASS;
• corrections. the waves go outside for base and enter inside for rover,
text label explains correction source and quality and delay of the cor-
rections;
• raw data recording status. It is green or red then not enough memory
in receiver for raw les. It ashes then le logging is on and current log
le name shows in the text label;
• receiver battery status. It is yellow or red then receiver battery should
be charged. Label below show free
• memory of receiver memory for raw le logging.
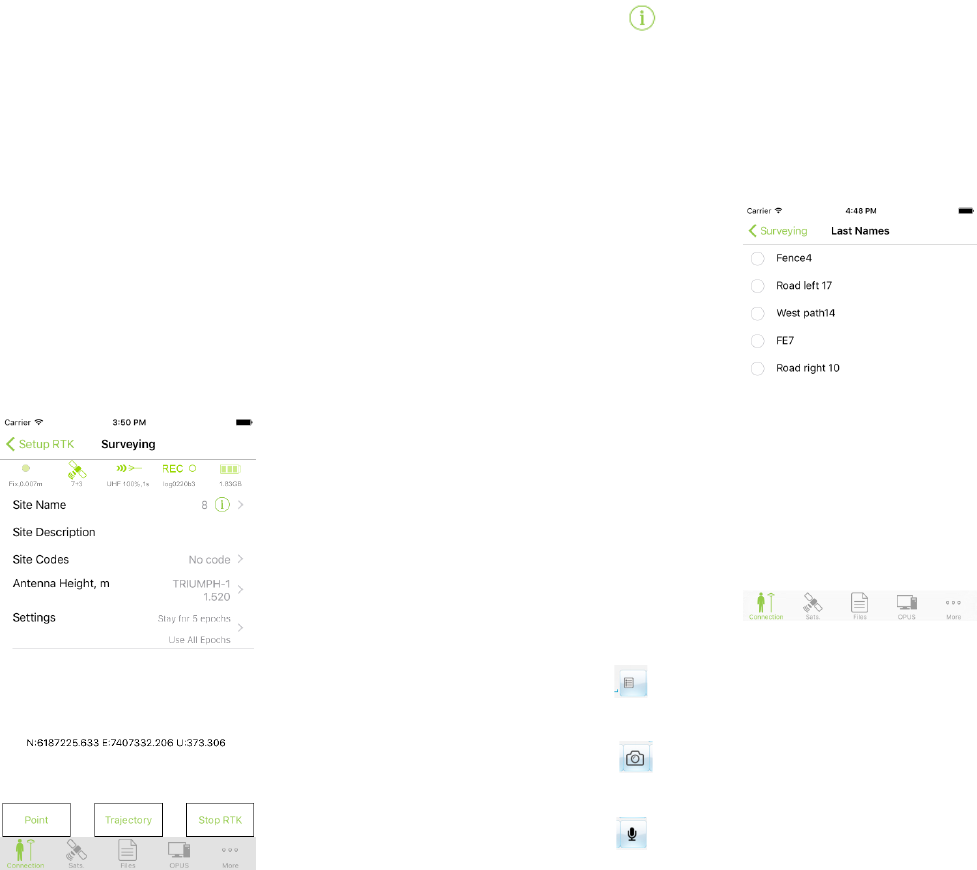
There are two buttons there: RTK Survey and RTK Stakeout.
Tap RTK Survey for surveying.
The RTK Survey screen includes several controls.
Figure 48. RTK Survey screen
• The Point button is used to start point survey;
• The Trajectory button is used to start trajectory survey;
• Close le button closes receiver le and nishes the surveying.
• Offset button is used for offset surveying.
• Site name, Site Description, and Site Code allow adding the informa-
tion about new point/trajectory to be surveyed.
The button near the site name opens the screen with last entered
names. For example, you have surveyed points pole1, pole2, pole3 and
then switched to survey the point tree. When you switched back to the next
point pole you don’t remember which number was the last. The list of last
names shows all unique names you used in the job with their numbers. Tap
to pole3 and JMT sets next point name pole4 to survey screen.
Figure 49. Last names screen
The button near Description opens the screen with the last descriptions
you added. You can use the same description without retyping it.
The button allows taking a photo and attach it after surveying to the
surveyed point.
The button allows recording an audio comment and attach it after sur-
veying to the surveyed point.
The information about the surveying is shown on the bottom: number of
surveyed epochs and number of epochs to be surveyed (and number of
rejected epochs), surveying time, and the line with coordinates. On the
www.javad.com 25
button are summarized the survey details: occupation time, epoch lter
and antenna model and height.
Figure 50. Information about the surveying
Figure 51. Button with information about the survey and settings
Tap on the bottom to see the survey settings:
Figure 52. Survey settings screen
• occupation time;
• which epochs to use (All, Float and Fixed or Fixed Only);
• if you need point conrmation screen after each point survey. The
conrmation screen shows all information about the surveyed point;
• antenna model, height and height type;
• logging rate and elevation mask;
• if you want to see DGPS solutions then neither Fixed nor Float posi-
tions computed;
• if you want to use coordinate system transmitted from your VRS with
RTCM 3.1 correction. In this mode JMT will not get positions from
standard WGS84 coordinates but tries recompute grid coordinates from
receiver into current working system and then into WGS84. This is an
experimental mode please consult with Javad GNSS before use it;
• congure sounds in JMT.
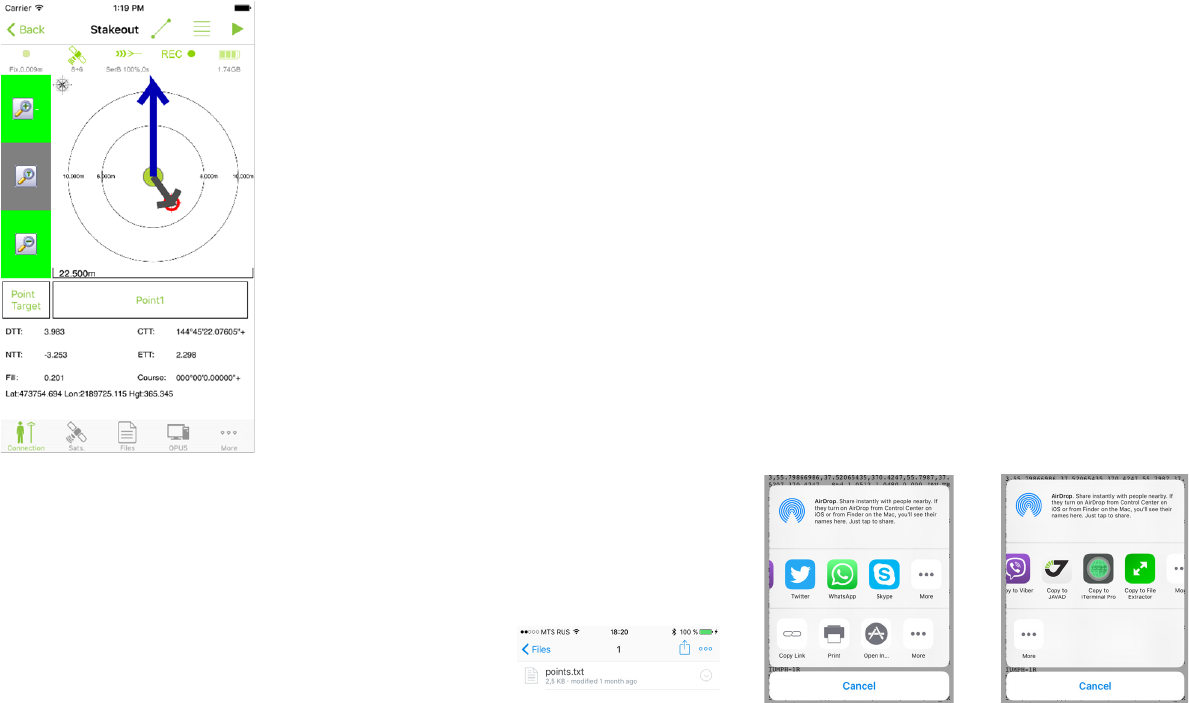
Stakeout
Tapping the Stakeout item on the home screen switches you to RTK
Stakeout screen, where the correction source can be set and receiver can
be congured for RTK.
Tap Start button and switch to Stakeout screen. It shows your position on
the map and let you select a target. (Your receiver can be precongured as
RTK rover in RTK Rover item before the stakeout).
Figure 53. Stakeout screen
With stakeout screens you can perform the points stakeout or stakeout
along line. Select a point with coordinate command or from list command

26 www.javad.com
or by tapping to a point and opening the stakeout menu item. To stakeout
along line select the Line command and dene a line with two points, line
stakeout mode will be used.
There are two screens for stakeout: map screen and “bull eye” screen. On
the rst screen you can see your position and target on the map. In the left
corner you can see your current coordinates in the current coordinate sys-
tem. In the right corner several information values are displayed:
• DTT (distance to target);
• CTT (course to target);
• NTT (north distance to target);
• ETT (east distance to target);
• Cut or Fill (height distance with target);
• Course (your current course);
In the line stakeout mode also you can see two additional values:
• Forward or Backward (distance along line);
• Left or Right (distance across line).
To set the target perform one of the following:
• tap to a point on the map;
• tap on the i-icon and select Stakeout command;
• tap on the button to select target from the point list;
• tap on the button to switch to next to next point in list or offset
along line;
• tap on the button to dene a line and dene a point related to the
line. Line is dened either two points or one point and a direction and
height difference. Then the line is dened you can set target position
along and across the line.
You can see red line between your position and red target mark position.
If the line stakeout mode is selected, you can see two points (1st for begin
and 2nd for end) linked with a magenta line, which denes your target line
and the target position dened related to the line.
Figure 54. Stakeout line target screen
Your goal is to reach the target.
To switch to “bulls eye” mode, tap the button with circles on left. In this
screen you can see the circle (“bulls eye”). Scale it to see your position
and the target position. Also you can tap the zoom button with T and the
software will change the scale automatically to keep target in the bull eye.
Your position or target position can be in the center of the screen. Tap to
the center to switch to this mode. So then your position is in the center
target is in the circle and then target positions in the center your position
is in the circle. The gray arrow shows the direction from your position to
the target.
The “bulls eye” map can be oriented to north (north up) or to your course
(course up). The orientation can be changed by tapping to the orientation
icon on the left top of the “bulls eye”. The blue arrow shows your course.
You should coincide the two arrows to go to target.
www.javad.com 27
Figure 55. Stakeout
On the bottom you can see the stakeout values like DTT, CTT, Course etc.,
and your current coordinates.
There are also two buttons on this screen: settings of the stakeout (antenna
height, which epochs to use), and survey button.
There are several buttons on the top of the screen. One is to change stake-
out target mode from the point to the line and vice versa. The second but-
ton is used to set the target. The right button with arrow is used to switch
to the next target point (works for both point and line mode).
Data exchange
The exchange data in iPhone/iPad is specic. The application documents
are separated, so you can’t open the job or the points from a le using any
le browser. But you can open the text le and the job archive from one
application and export it to the JMT software.
The JMT simplies the sharing process with built-in FTP server, iTunes,
and JustinLink. The JMT can export the job, survey points to another iP-
hone or iPad, download receiver jps les.
The data can be exported either to iCloud Drive or opened in another ap-
plication on iPhone/iPad (messaging, e-mail, DropBox/Google Drive).
The alternative way to exchange the data is to use the free JAVAD desk-
top application Justin Link or any FTP-client to connect to the JMT and
download the data.
Import of the Design point
To perform the stakeout you need to have the design points. You can enter
them manually, and you can import them from a text le. The JMT sup-
ports import from user-dened text les.
Open the le which should be imported to the JMT in any application
on your iPhone/iPad and select the export button. Select Open in JAVAD
item.
Figure 56. Import of design points
Import screen appears. Here you can select the le for the import and spec-
ify all le format parameters.
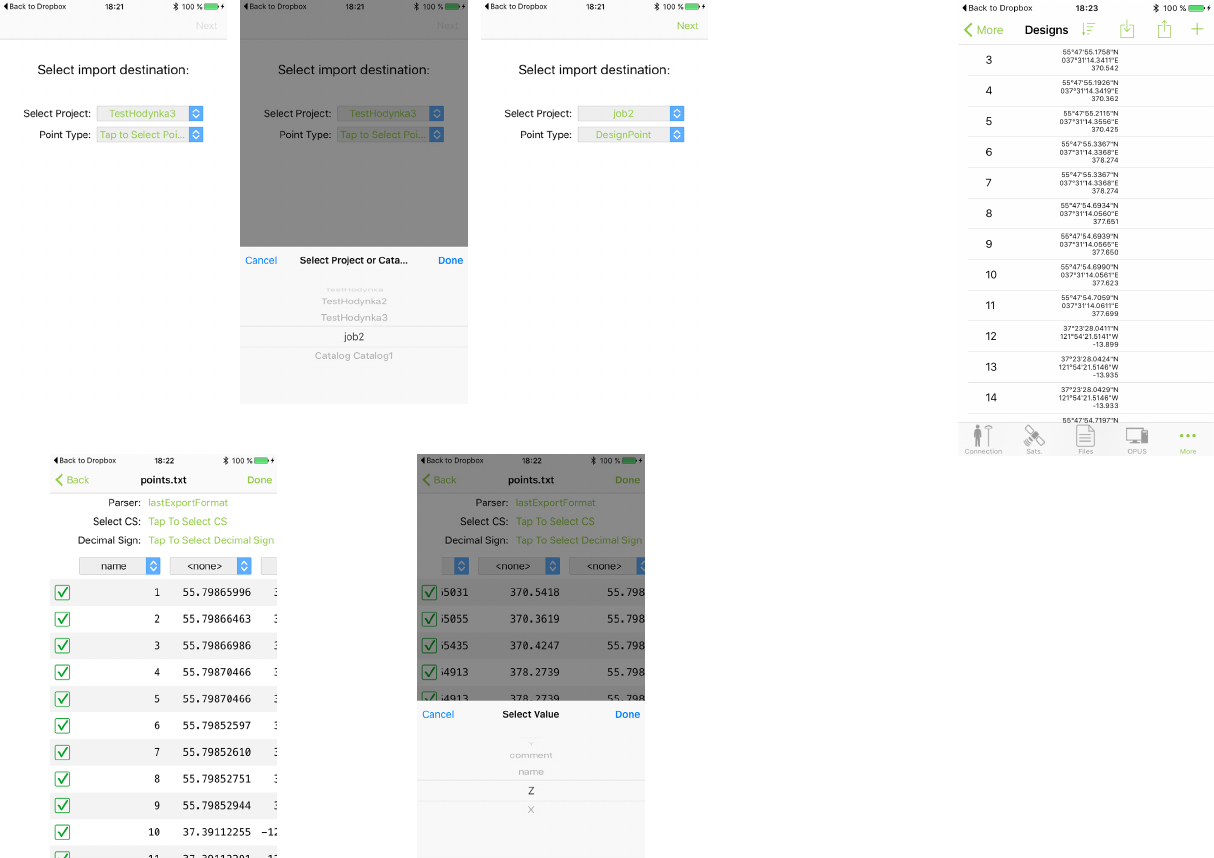
28 www.javad.com
Figure 57. Import process
Finally you can check the result points in the job.
Figure 58. Imported design points
Export point to user defined text file
In the list of points select the points you want to export (or if you want to
export all data don’t select anything at all). Press Settings hardware button
and choose the Select command. The Export button appears. Tap it and
the Export dialog appears, you can dene format for export: number of
columns, delimiter and columns data with the list headers. You can change
the coordinate system. In that case the JMT software writes coordinate
recomputing on the le.
Tap the green button on the top and select the le to export.
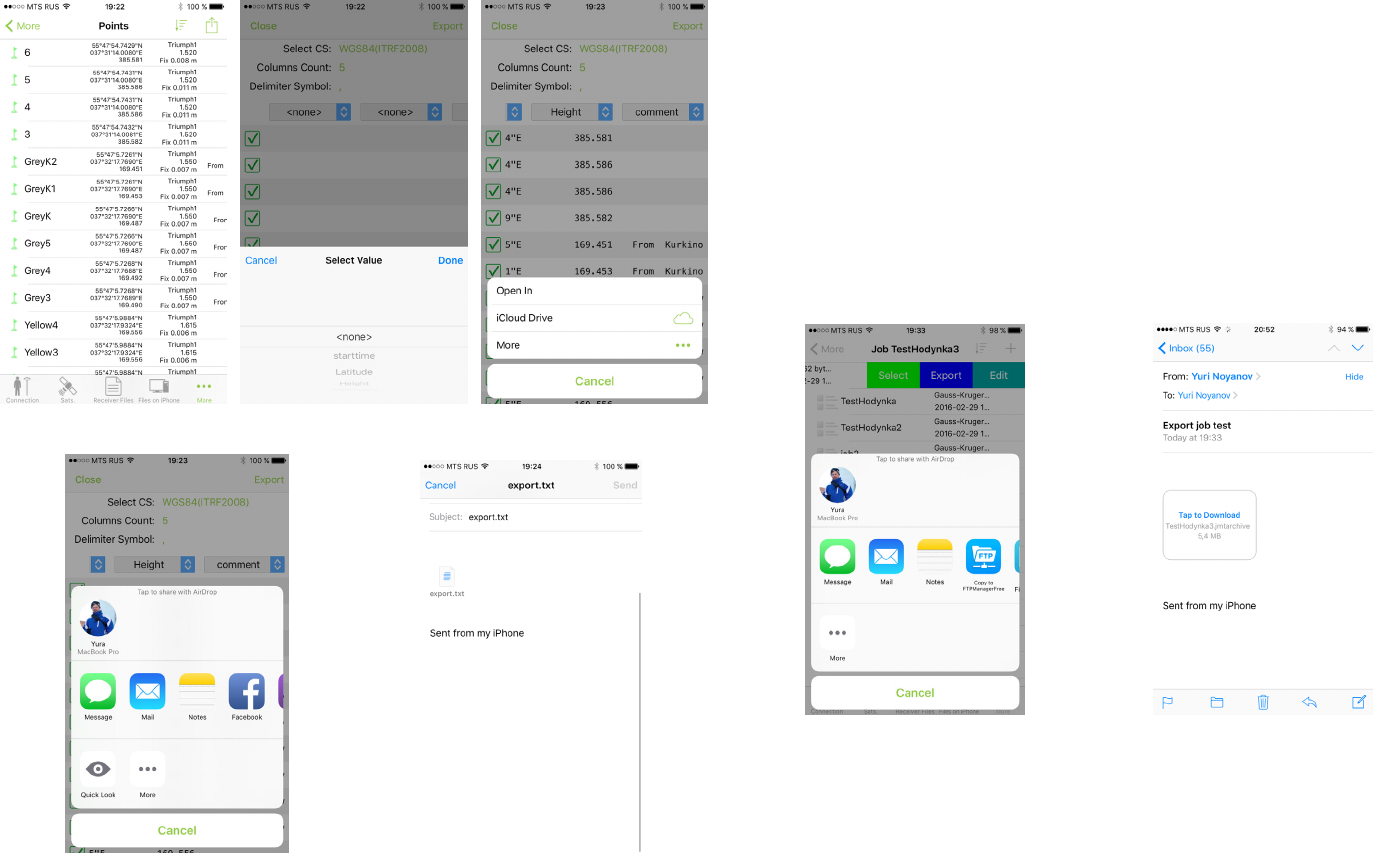
www.javad.com 29
Figure 59. Export of surveyed points
Job export and import
The JMT software can export the job folder as one le with
.jmtarchieve.
The le can be opened with JMT.
In Jobs screen swipe job item and select Export command. Standard list
of programs appears. For example, you can select e-mail or messaging to
send it to another device.
So you can send the
.jmtarchive
le. On other iPhone/iPad then you
receive such le you can select Open in action and select Copy to JAVAD
application. JMT with the job will be opened.
30 www.javad.com
Figure 60. Export and import of jobs
Export downloaded receiver jps files
JMT can directly export downloaded jps les. Swipe left a le item and
select Export command. Select the application to be uses for the export.
Using JustinLink
JustinLink is a JAVAD free desktop application for exchange data with
JAVAD mobile application like J-Field, Tracy and JMT. It can be down-
loaded it from JAVAD web site:
http://javad.com/jgnss/prod-
ucts/software/justinlink.html
Note: JAVAD’s Justin software includes JustinLink.
Run Justi Link or Justin and select the button on the tool bar. The list
of the remote devices with their projects will be shown.
Note: The devices should be in the same network (local Ethernet or WiFi network).
Select the project(s) you want to import and click the Import button. If
you want to export the design points, you need to select the points in the
JustinLink and to create them by clicking New Project or export to an ex-
isting project.
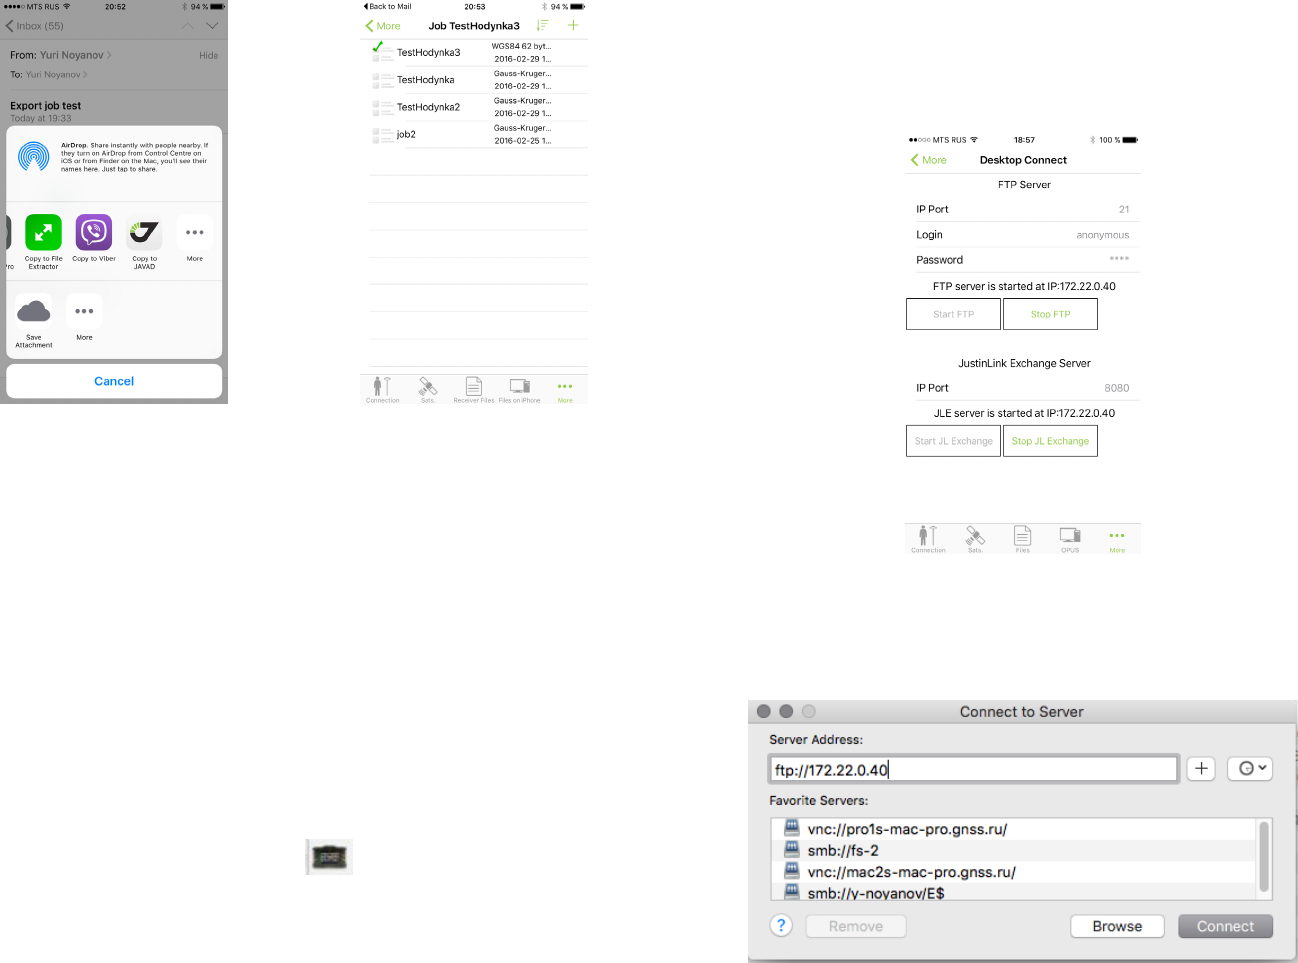
Using built-in FTP server
The JMT software includes the FTP server, so any PC in the network can
be connected to it and the data can be downloaded or uploaded. You can
see status of the FTP server using Desktop Connect screen:
Figure 61. Desktop connection screen
On the PC you use any FTP client, e.g. built into Mac Finder. Enter the
IP address you can see in the Desktop Connection screen in JMT. Select
Guest(Anonymous) access.
www.javad.com 31
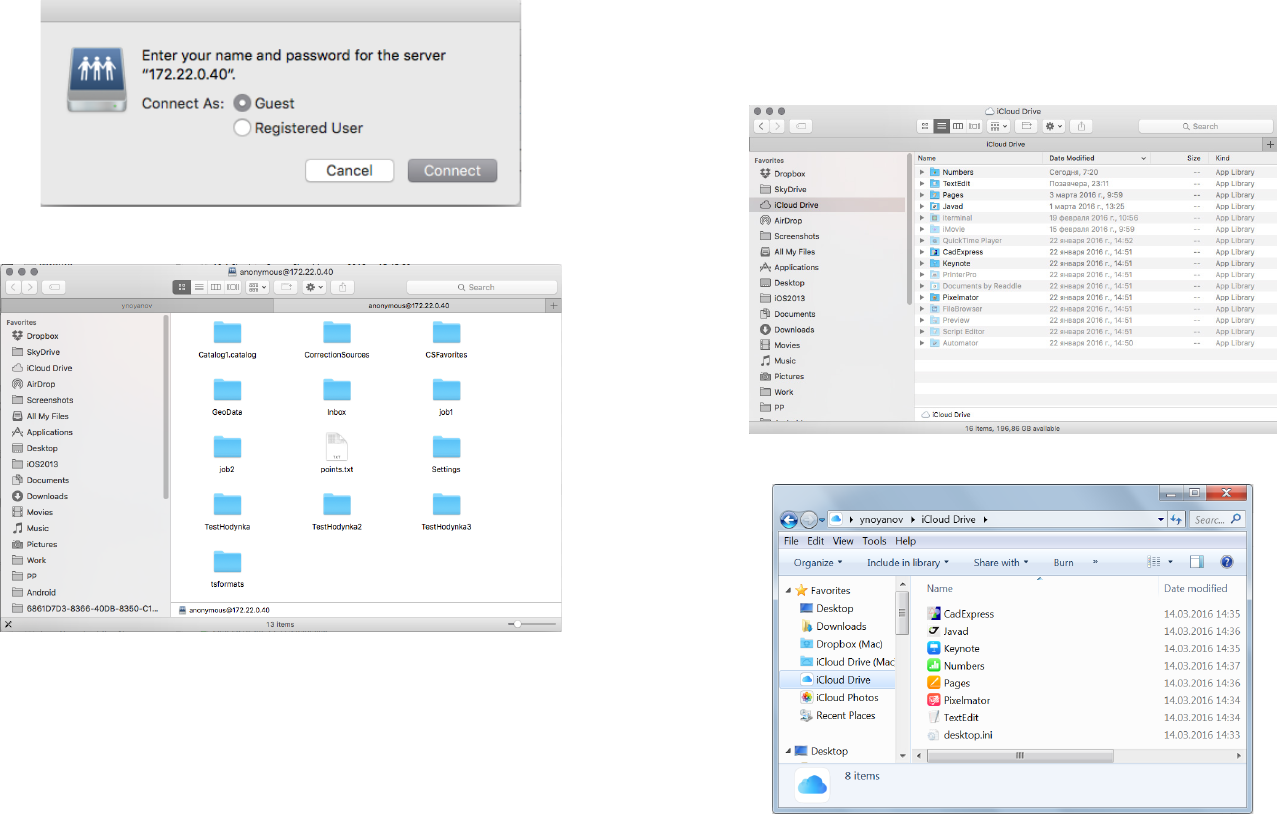
Figure 62. FTP connection on PC under Mac OS X
Figure 63. Content of JMT in Finder on PC under Mac OS X
You will see in the Finder contents of JMT Documents folder. Each job is
organized as a sub folder. You can copy and paste jobs. There are catalogs
in the folder with
.catalog
sufx in the name. CSFavorites folder is for
exchange the coordinate systems, GeoData folder is for binary CS-data
like geoids, and Settings folder store internal settings for the application.
CorrectionSources folder stores your correction source settings for UHF,
FH, RCV etc.
Note: Please be careful with internal structure of JMT to don’t cause the application crash.
Using iCloud Drive
With iCloud Drive you can perform the exchange data between iP-
hone/iPad and the PC. On the Mac computer for Windows-based PC
you can use iCloud Panel (
http://download.info.apple.com/
Mac_OS_X/031-42826-20151207-c2afdd40-9ac5-11e5-8899-
b16ff5563fd9/icloudsetup.exe
) to share les. The JAVAD folder
is used by default to export receiver log les and points.
Figure 64. iCloud Drive on PC under Mac OS and Windows 7
For example for receiver les switch to Files on the iPhone and swap a le
to left, select Export command and select iCloud Drive and select location
to store, tap Export to this location on the bottom.
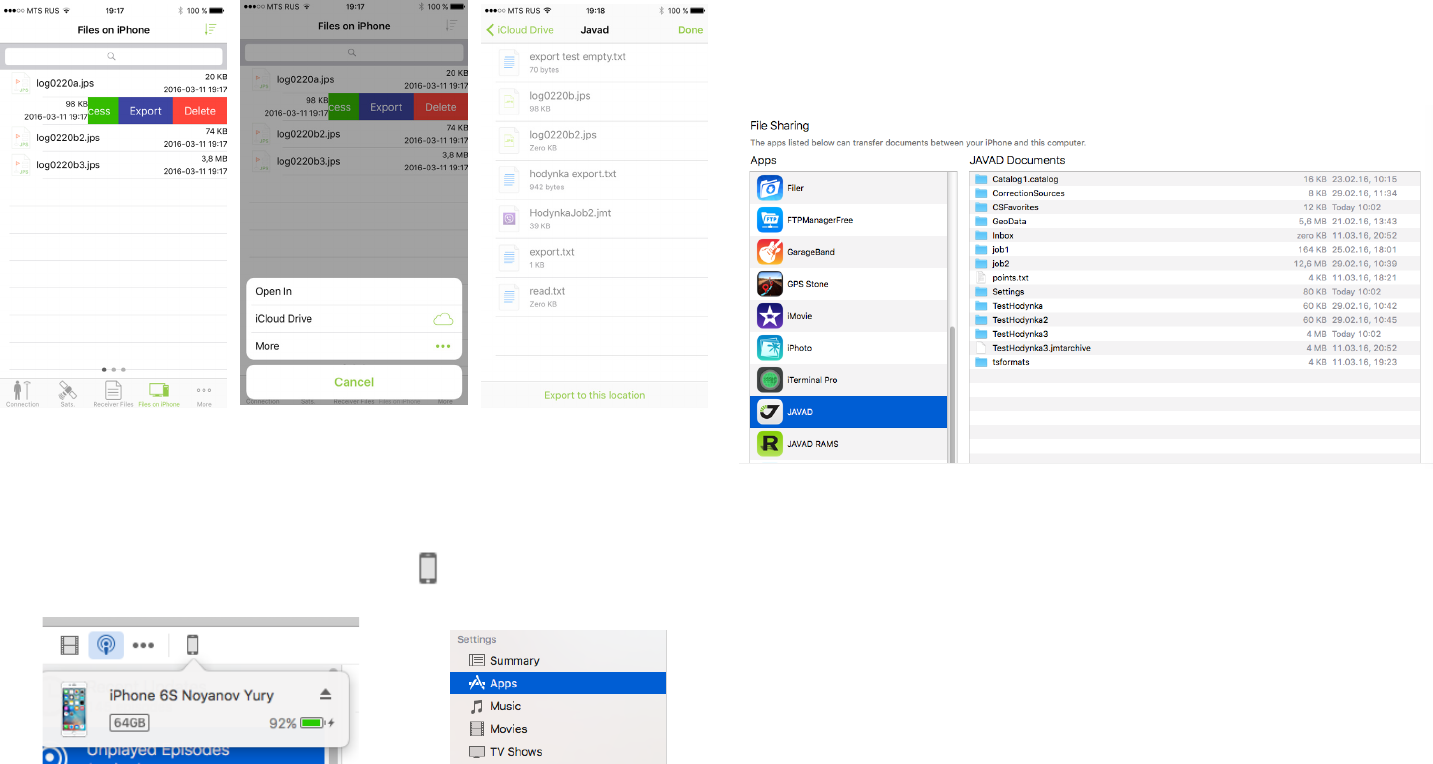
32 www.javad.com
Figure 65. Export receiver jps files in JMT into iCloud
Using iTunes
Connect your iPhone/iPad to your PC (runs under Windows or Mac OS
X), Apple and start iTunes. Device icon is .
Figure 66. Mobile device in iTunes
Click to the icon and select Apps item. Then select File Sharing area
and JAVAD item there. On the right you can see the content of the JMT
Documents folder.
Use Add button to copy to Documents or Save to… but-
ton to save the le in other folder. Alternatively you can use
Drag-and-Drop option to copy from and to Documents folder.
There are catalogs in the folder with
.catalog
sufx in the name.
CSFavorites folder is for exchange the coordinate systems, GeoData fold-
er is for binary CS-data like geoids, and Settings folder store internal set-
tings for the application. CorrectionSources folder stores your correction
source settings for UHF, FH, RCV etc.
Note: Please be careful with internal structure of JMT to don’t cause the application crash.
Figure 67. Contents of JMT in iTunes
Note: iTunes can be downloaded for free from Apple web-site http://www.apple.com/
itunes/download/
Map
The JMT software has the Map item where you can see all your job data
as survey points, design points and your current location. With the Map
screen you can draw sketches and make the simple measurements of the
distances and areas. On the top you can see the switcher between the map
and the satellite view.
www.javad.com 33
Figure 68. Contents of JMT in iTunes
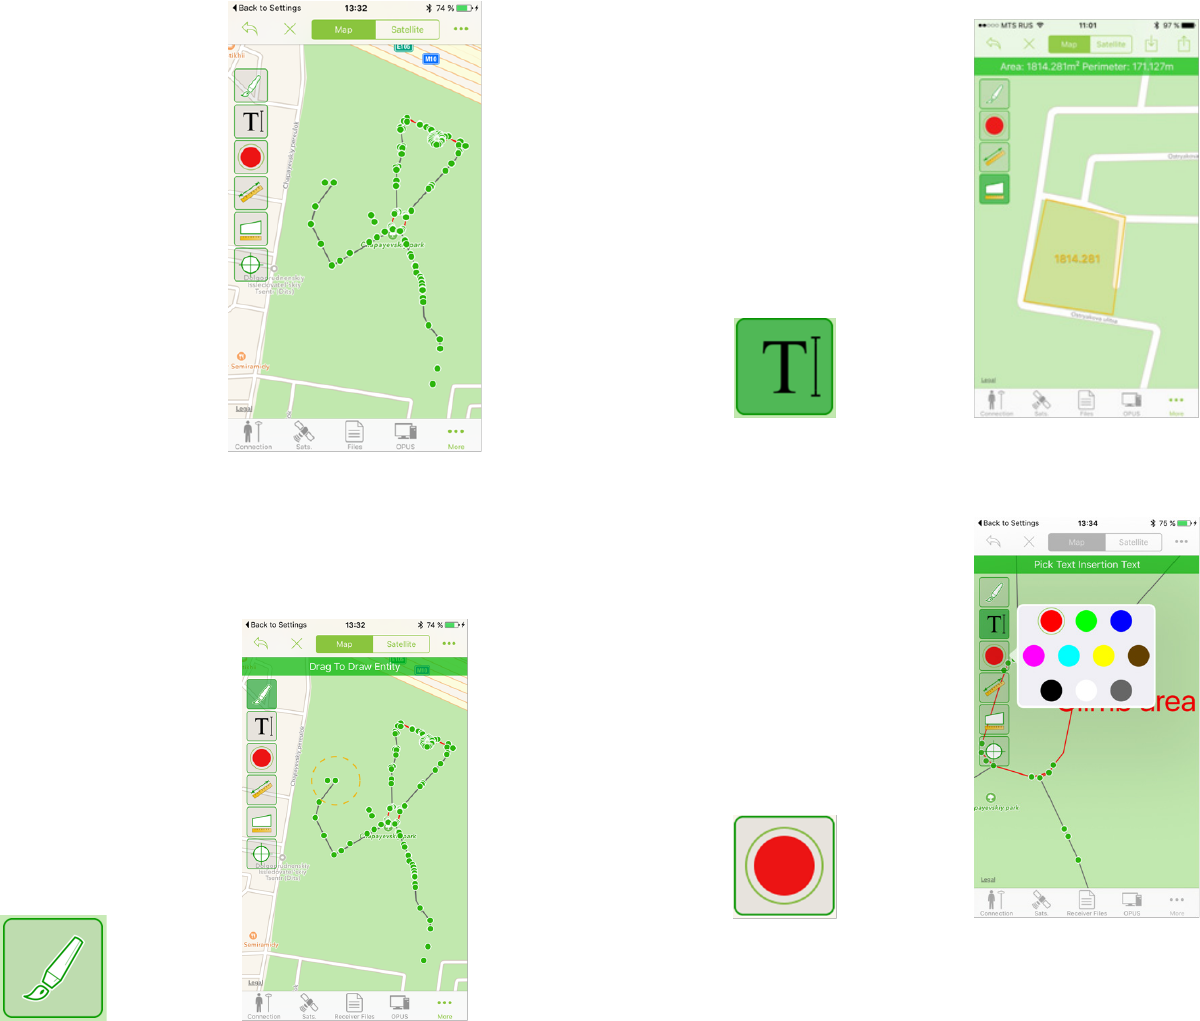
Map screen has several tools, described below.
Draw: The tool allows drawing the sketches on the map to combine the
points into the complex objects and to visualize your survey.
Figure 69. Draw
Draw text: Allow add text annotations into the map.
Figure 70. Draw text
Color: this tool sets color for lines and texts.
Figure 71. Color
Measure distance: The tool allows measuring the distances between se-
lected points.
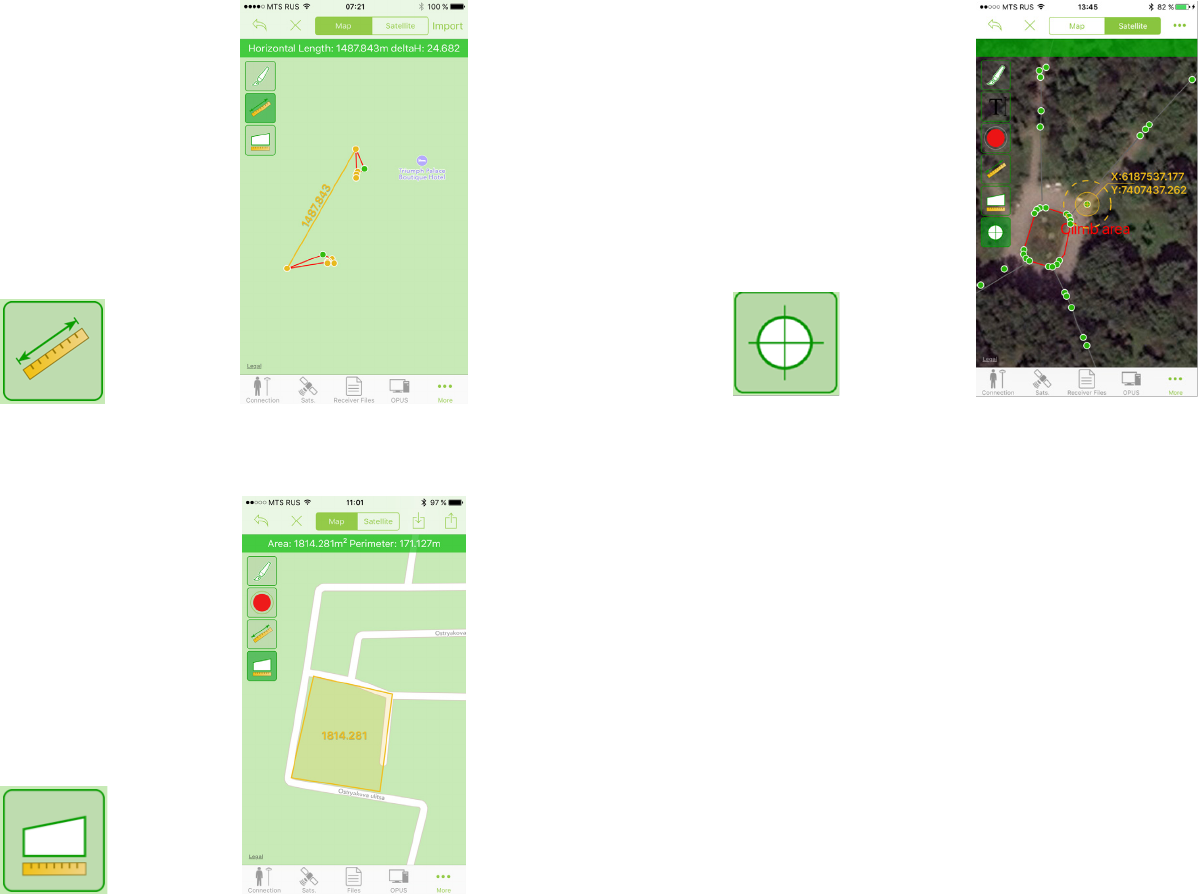
34 www.javad.com
Figure 72. Measure distance
Measure area: The tool allows measuring the areas.
Figure 73. Measure area
Measure position: this tool allows obtaining coordinates of a point on map.
Figure 74. Measure position
Map shift. Because Google map precision is not perfect in some areas, the
map includes tool to match your points with the Google map. Press button
on top of the screen and select Shift action. Them you can just move map
around immovable points to match them as much as possible.
Map export.
Points and drawing on the map can be exported. Tap the button on the top
and select the Export command.
www.javad.com 35
Figure 75. Export
You can select the format for the export of the optional parameters. Set the
parameters and tap Export on top. The following screen appears there you
can select what to do with result le.
Compass and level calibration
TRIUMPH-2 and TRIUMPH-1M receivers have internal compass and
levels. That helps you several ways - for stakeout you can see direction
even when you don’t move, for surveying your receiver corrects its in-
clination (you don’t have to constantly see the bubbles because compass
and levels correct the inclination).To operate correctly compass and levels
should be calibrated. You can use the JMT software to calibrate the inter-
nal compass and levels.
Select Calibrate item on the home screen, Calibration screen appears.
Figure 76. Calibration
It shows the status of compass and levels and allows calibrating compass
and levels and adjusting levels offsets with Offsets button.
Compass calibration
Compass calibration starts by tapping the Start Compass Calibration but-
ton. For compass calibration you should rotate the receiver for all axes for
one minute. The screen shows recommended rotation types.
36 www.javad.com
Figure 77. Compass calibration
Levels calibration
For level calibration you need to place the receiver on the at horizontal
surface. The screen shows which side should be up. To start calibration tap
Start Levels Calibration button. Image with receiver orientation appears.
Set the receiver like depicted and tap Start Side Calibration button.
Figure 78. Level calibration
Don’t move or shake receiver for the one minute. The same way the next
side will be calibrated. When all sides are calibrated the levels calibration
is over.
Removing Levels Offsets
If you don’t need for any reason the full calibration of levels, and you see
the level value offsets (displayed in X: and Y: texts) when the receiver is
in the at horizontal surface, tap Offset button and level offsets will be set
to zero.
OAF check and update
At each receiver connection JMT check authorization options (OAF) for
the receiver. If the options are going to be expired or have expired, you
will see a warning. It includes Update button that can download current
OAF options and load them into the receiver.

www.javad.com 37
Figure 79. OAF Warning
After the loading receiver will be cleared and may be reconguration for
the receiver will required.
Working with Apple Watch
If your iPhone is paired with an Apple Watch, the JMT software can be in-
stalled on the Apple Watch. With Apple Watch you can control your Javad
GNSS receiver connected to the iPhone. The iPhone can be in the safe
place like your pocket and you can control the start and stop of the survey-
ing as well as the stakeout with the watch on your wrist.
After the JMT is successfully installed on your Apple Watch you can see
its icon on the watch screen. Tap it to run the JMT.
Figure 80. JMT icon on Apple Watch
Before the connection to a receiver it shows the following screen, asking
you to run the JMT on the iPhone and connect it to a JAVAD GNSS re-
ceiver:
Figure 81. JMT screen before connection
After connection is established you can see status of the receiver and the
surveying parameters.
38 www.javad.com
Figure 82. JMT screen on watch after connection
Run the JMT on your iPhone and switch to RTK Surveying or RTK Stakeout
to control the surveying or staking out.
In the survey mode you can see the parameters of the receiver and the
name of surveying point. Using the Start and Stop buttons you can perform
the data collection.
Figure 83. Survey screen on Apple Watch
In the Stakeout mode you can see your position and the target position on
the map and the distances with course to the target in texts.
Figure 84. Stakeout screen on Apple Watch
www.javad.com 39

900 Rock Avenue, San Jose,
CA 95131, USA
Phone: +1(408)770-1770
Fax : +1(408)770-1799
www.javad.com
All rights reserved © JAVAD GNSS, Inc., 2016
