Sfaira ONE GNSS Receiver
User Manual
V1.0, modified on 06/03/2023

Sfaira ONE GNSS Receiver User Manual
Corporate Office
SingularXYZ Intelligent Technology Ltd.
Address: Floor 2, Building A, No. 599 Gaojing Road, 201702 Shanghai, China
Tel: +86-21-60835489
Fax: +86-21-60835497
Website: https://www.singularxyz.com
E-mail: singularxyz@singularxyz.com
Copyright Notice
This is the V1.0 (Jun, 2023) revision of the Sfaira ONE GNSS Receiver User Guide. It cannot be
copied or translated into any language without the written permission of SingularXYZ.
Technical Assistant
If you have any questions that can’t be solved in this manual, please contact your local
SingularXYZ distribution partner. Alternatively, request technical support from SingularXYZ
Intelligent Technology Ltd.
Support Skype: Support.SingularXYZ
Your feedback on this manual will help us improve it with future revisions.
Safety Information
Before using the receiver, please make sure that you have read and understood this User Guide,as
well as the safety requirements.
• Connect your devices strictly based on this UserGuide
• Install the GNSS receiver in a location that minimizes vibration andmoisture
• Avoid falling to ground, or colliding with otheritems
• Do not rotate 7-pin Lemo port
• Do not cover the radio, keep a sound ventilation environment
• To reduce radiation, please keep above 2 meters away from the radiostation
• Take lighting protection measures when installing antennas
• Change the cable if damaged
Use and Care
The receiver can withstand the rough treatment that typically occurs in the field. However,the
receiver is high-precision electronic equipment and should be treated with reasonablecare.
Sfaira ONE GNSS Receiver User Manual
Warning and Caution
An absence of specific alerts does not mean that there are no safety risks involved. A Warningor
Caution information is intended to minimize the risk of personal injury and/or damagetothe
equipment.
WARNING- A Warning alerts you to a potential risk ofserious injury to your person and/or
damage to
the equipment, because of improper operations or wrong settings of the equipment.
CAUTION- A Caution alerts you to a possible risk of damage to the equipment and/or data loss.
Warranty Notice
SingularXYZ does not warranty devices damage because of force majeure (lighting,high voltage
or collision).
SingularXYZ does not warranty the disassembleddevices.
©2023 SingularXYZ Intelligent Technology Ltd. All rights reserved.
Sfaira ONE GNSS Receiver User Manual
CONTENTS
1 Introduction .......................................................................................................................................... 1
1.1 Overview ..................................................................................................................................... 1
1.2 Receiver features .........................................................................................................................1
1.3 System Composition ................................................................................................................... 1
2 Setup of the Sfaira ONE .......................................................................................................................3
2.1 Environment Requirements .........................................................................................................3
2.2 Power supply ...............................................................................................................................3
3 Connect with SingularPad ................................................................................................................... 4
3.1 Create a new project .................................................................................................................... 4
3.2 Connect to receiver ..................................................................................................................... 6
3.3 Quick Setup Your Receiver ........................................................................................................ 9
3.4 Survey ....................................................................................................................................... 12
3.5 Stake Out ...................................................................................................................................15
4 RTK Workflow In SingularSurv ...................................................................................................... 19
4.1 Create a new project .................................................................................................................. 19
4.2 Connect to receiver ....................................................................................................................21
4.3 Quick Setup Your Receiver ...................................................................................................... 23
4.4 Survey ....................................................................................................................................... 26
4.5 Stake Out ...................................................................................................................................28
5 Connect with GIS Software ............................................................................................................... 31
Sfaira ONE GNSS Receiver User Manual
1
1 Introduction
The SingularXYZ Sfaira ONE GNSS Receiver User Manual is aimed to help you get familiar with
the Sfaira ONE GNSS Receiver and start your project effectively. We highly recommend you to
read this manual before surveying, even you have used other GNSS RTK receivers before.
1.1 Overview
Sfaira ONE GSS receiver is equipped with a high-precision GNSS engine which can
simultaneously track GPS, BDS, GLONASS, Galileo & QZSS, providing stable and accurate
centimeter-level positioning. Sfaira ONE receiver has ultra-small size and strong anti-interference
ability to make it possible to work even in hash environments. It is an ideal RTK/GNSS product
for surveyors.
1.2 Receiver features
The Sfaira ONE GNSS Receiver key features:
Portable: Φ50 mm ×149 mm Ultra small size and 409g super light
Can work at high intensity continuously for more than 16 hours
Cable-free Bluetooth wireless technology
1408 channels of simultaneously signal tracking
Centimeter level accuracy
IP65 waterproof
Designed to survive a 1.5m drop onto concrete
1.3 System Composition
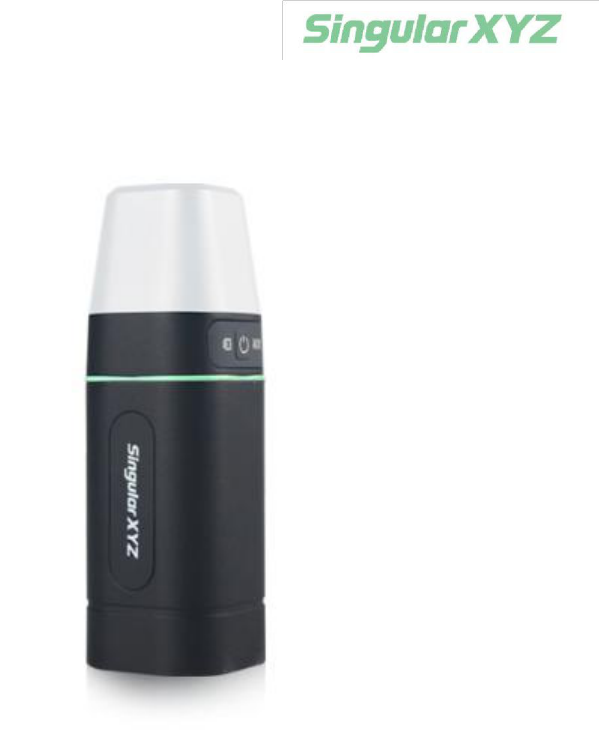
Sfaira ONE GNSS Receiver *1
Sfaira ONE GNSS Receiver

Sfaira ONE GNSS Receiver User Manual
2
USB-Type C Cable*1
USB-Type C Cable

Sfaira ONE GNSS Receiver User Manual
3
2 Setup of the Sfaira ONE
2.1 Environment Requirements
To keep the receiver with a reliable performance, it is better to use the receiver in safe
environmental conditions:
Operating temperature:-45℃to+75℃
Storage temperature:-55℃to+85℃
Out of corrosive fluids and gases
With a clear view of sky
Do not expose to water for a long time
2.2 Power supply
The Sfaira ONE GNSS receiver comes with a large 4800mAh rechargeable Lithium-ion battery
that supports Type-C charging.The internal battery provides you an effective survey workflow
with about 16-hours operating times as a rover. However, this operating time varies based on
environmental conditions.
•
Receiver Safety
Charge and use the Receiver only in strict accordance with the instructions below:
–
Do not use or charge the Receiver if it appears to be damaged. Signs of damage include,
but are not limited to, discoloration, warping, and leaking Receiver fluid.
–
Do not expose the Receiver to fire, high temperature, or direct sunlight.
–
Do not immerse the Receiver in water.
– Do not use or store the Receiver inside a vehicle during hot weather.
– Do not drop or puncture the Receiver.
– Do not open the Receiver or short-circuit its contacts.
- Charging the Lithium-ion Receiver
Please use Type C cable for charging. Please obey the following instructions when charging
your batteries:
– Charge the Receiver completely before using it for the first time.
– Fully charge takes approximately 2 hours per Receiver at room temperature.
–
If the Receiver has been stored for a long time, charge it before your fieldwork.
– Re-charge the Receiver at least every three months if it is to be stored for long time.
- Storage of the Lithium-ion Receiver
– Keep receiver in dry and room temperature conditions.
Power light status:
Power on and not charging: keep red when power is more than 10%, flash red when less than
10%.
Charging: Keep green when it is fully charged, flash green when it is charging.
Sfaira ONE GNSS Receiver User Manual
4
3 Connect with SingularPad
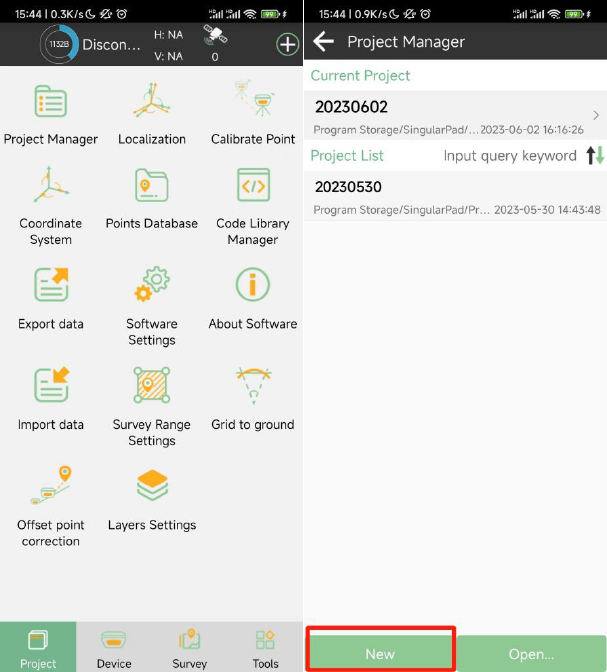
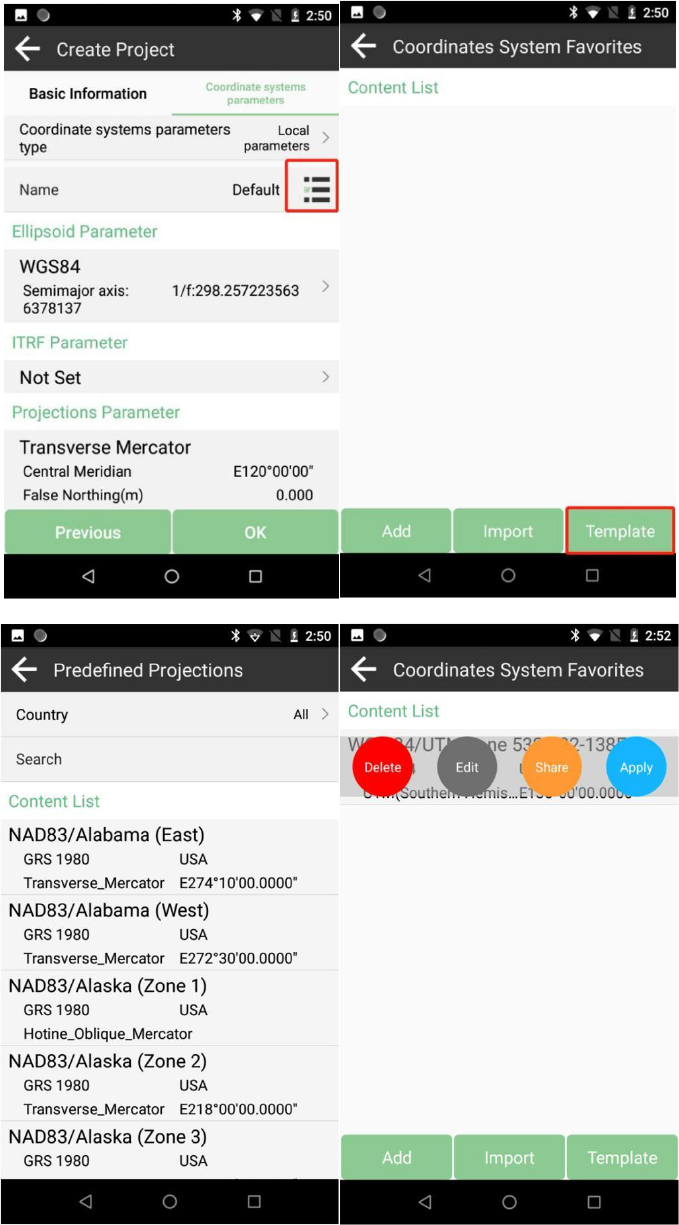
3.1 Create a new project
Click Project Manager, click the New button in the lower left corner of the screen and input
project name, set coordinate systems parameters and save the project. In Project Manager
interface, you can click previous projects in the Project List to remove or open it.
Sfaira ONE GNSS Receiver User Manual
5
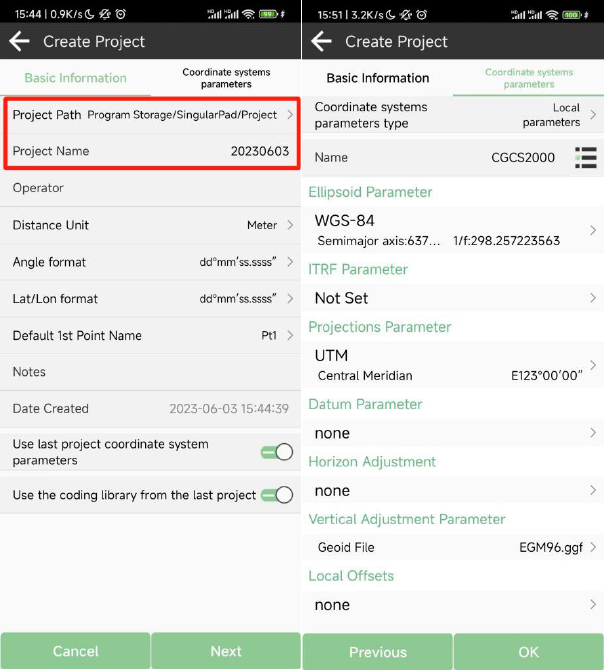
If you have added one project, you can click the project name in the main interface to check the
current project details, including Project Name, Project Path and Coordinate systems parameters.
And you can edit it.
How to create a user defined datum: If you cannot find datum you want in the list, follow
instructions below to add one: select ellipsoid para, projection para, datum para, and input
horizon adjustment, vertical adjustment and local offsets based on your request. Save and apply
it. Meanwhile you can share the coordinate system with your workmates.
Sfaira ONE GNSS Receiver User Manual
6
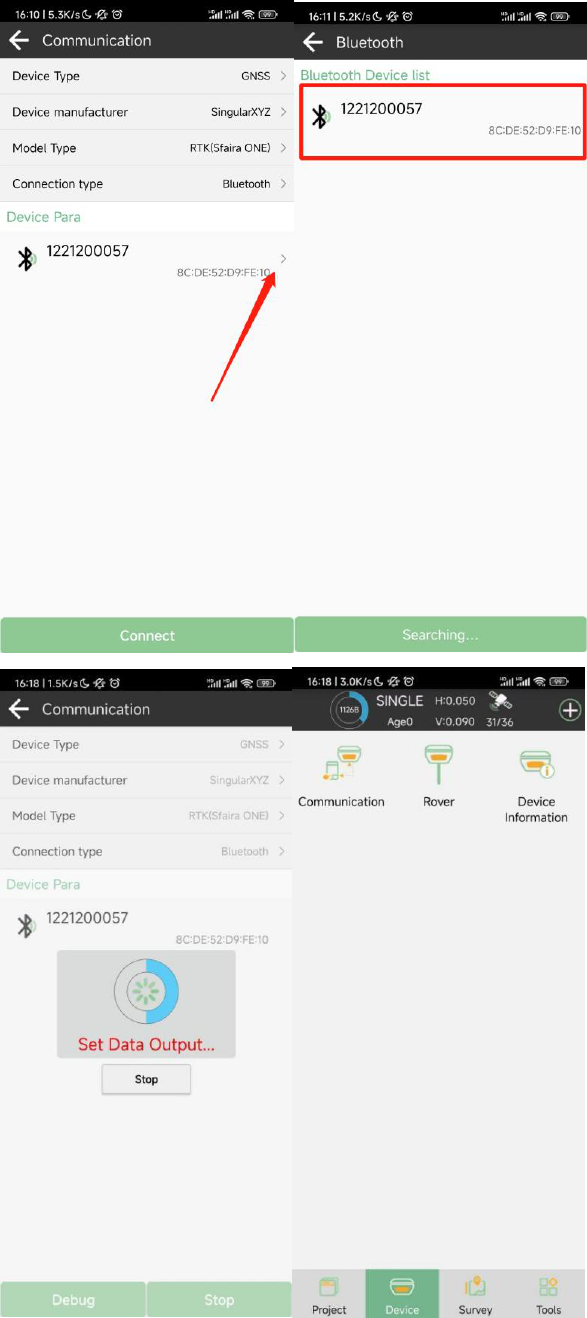
3.2 Connect to receiver
After creating a new project, switch to Device, click Connection. You can connect SingularPad

Sfaira ONE GNSS Receiver User Manual
7
with SingularXYZ Sfaira ONE receivers. You should choose the follow types, search and connect
the Bluetooth of Sfaira ONE:
Sfaira ONE GNSS Receiver User Manual
8
Tips: If you failed to connect with receiver through SingularPad, you can just follow prompt
info to go into the device Bluetooth setting interface to make sure Bluetooth paired successfully.
Sfaira ONE GNSS Receiver User Manual
9
Sometimes you need forget the device Bluetooth, restart the receiver or software and get pair
again.
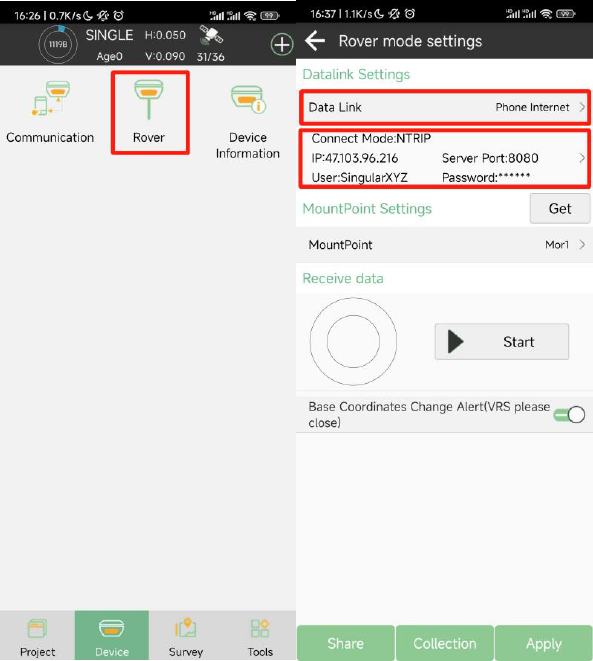
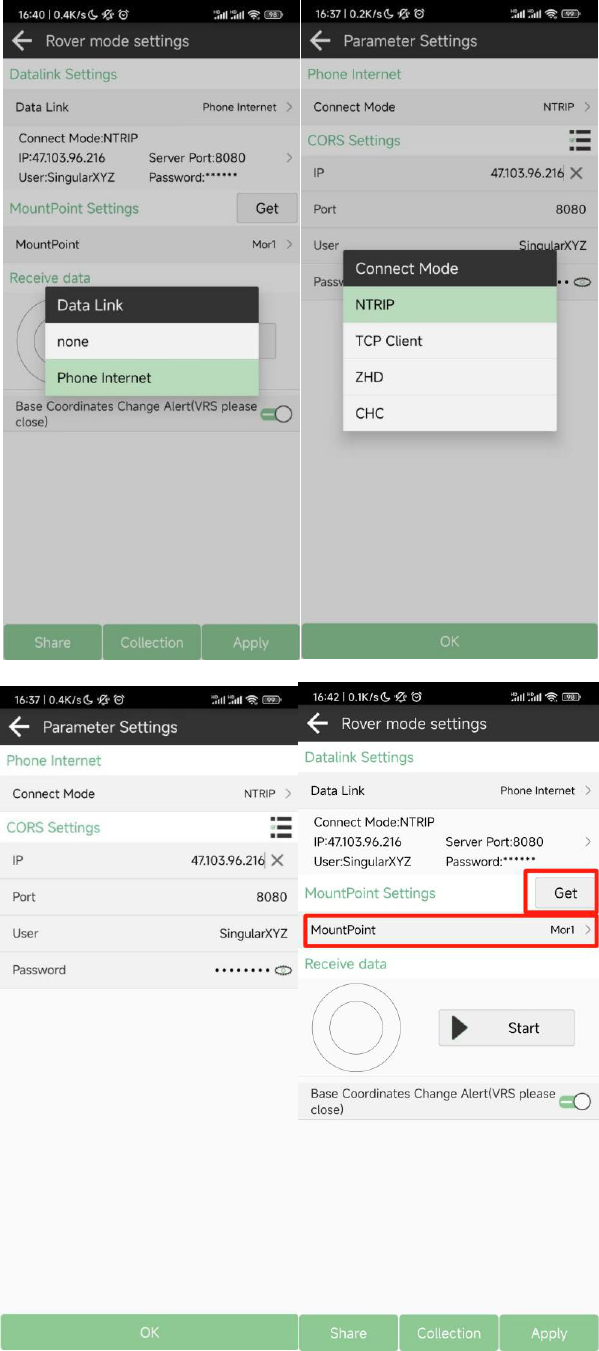
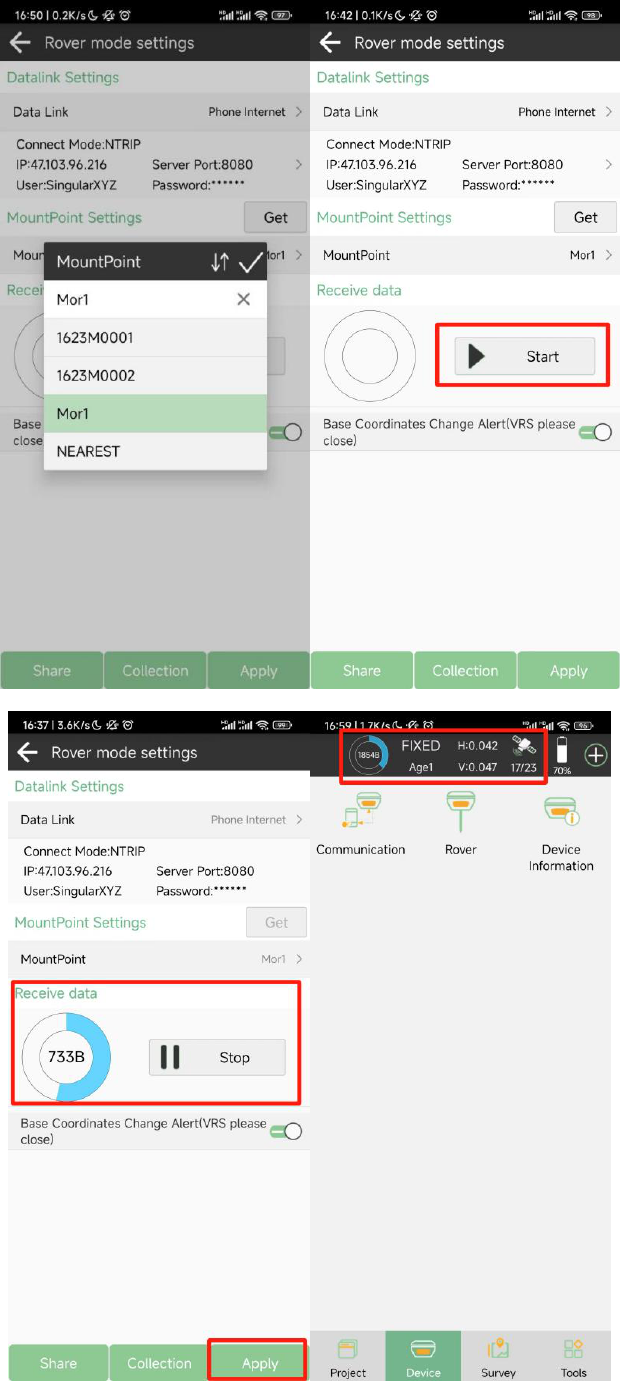
3.3 Quick Setup Your Receiver
Sfaira ONE can only be used as rover in Phone Internet mode. You can set it in Rover, set the Data
link as Phone Internet, Connect mode as NTRIP, enter the IP address, Poirt, User and Password of
you CORS. Click get to get the mount point, and then select the mount point and click start, you can
determine whether the connection is successful by whether you have received data, if you receive
the data, then click Apply, the position status will change to Fixed.
Sfaira ONE GNSS Receiver User Manual
10
Sfaira ONE GNSS Receiver User Manual
11
Sfaira ONE GNSS Receiver User Manual
12
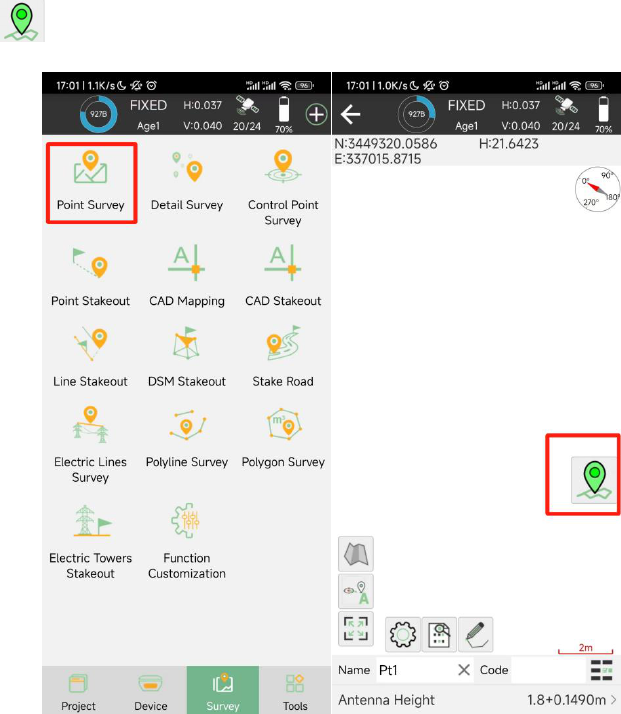
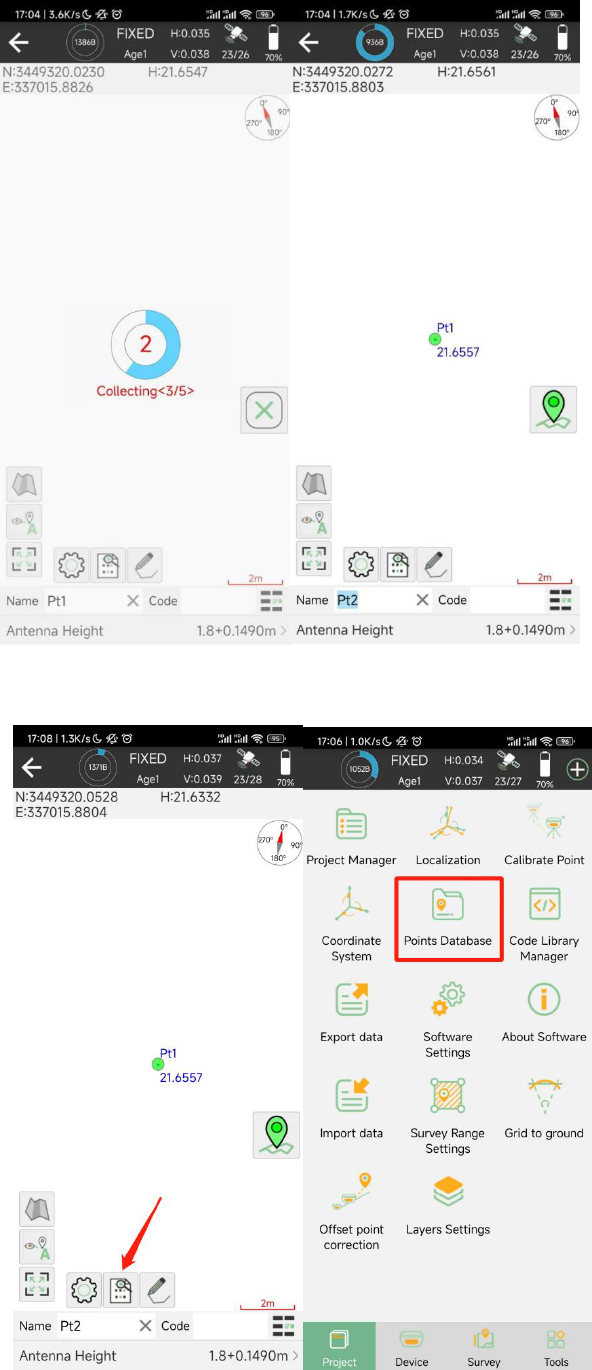
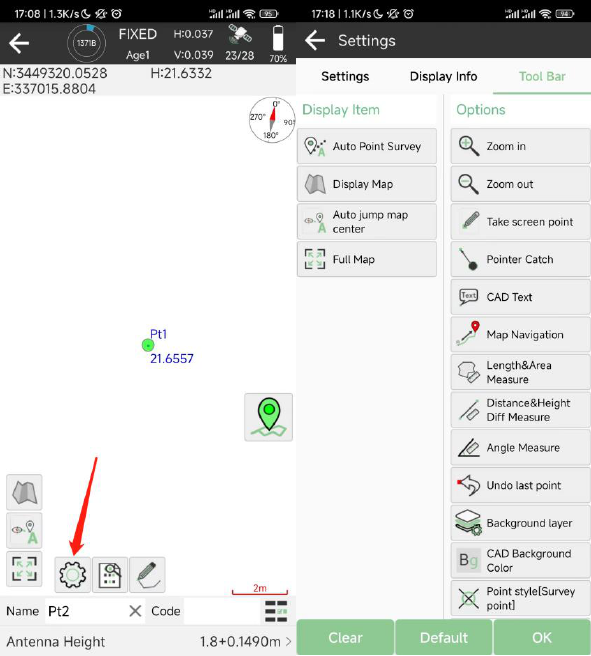
3.4 Survey
In the Survey interface, click Point Survey-> enter point name, code and antenna height,
->click to start or stop collecting data.
Sfaira ONE GNSS Receiver User Manual
13
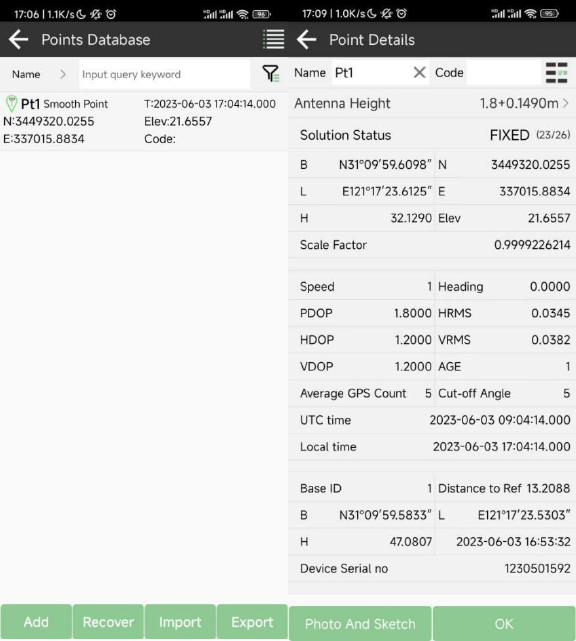
In the Point Database, you can see the point you surveyed.
Sfaira ONE GNSS Receiver User Manual
14
Besides common point survey, there are many other survey mode you can choose, you can find
them at Settings>Tool Bar, you can click the option and click OK to add it on the survey interface.
Sfaira ONE GNSS Receiver User Manual
15
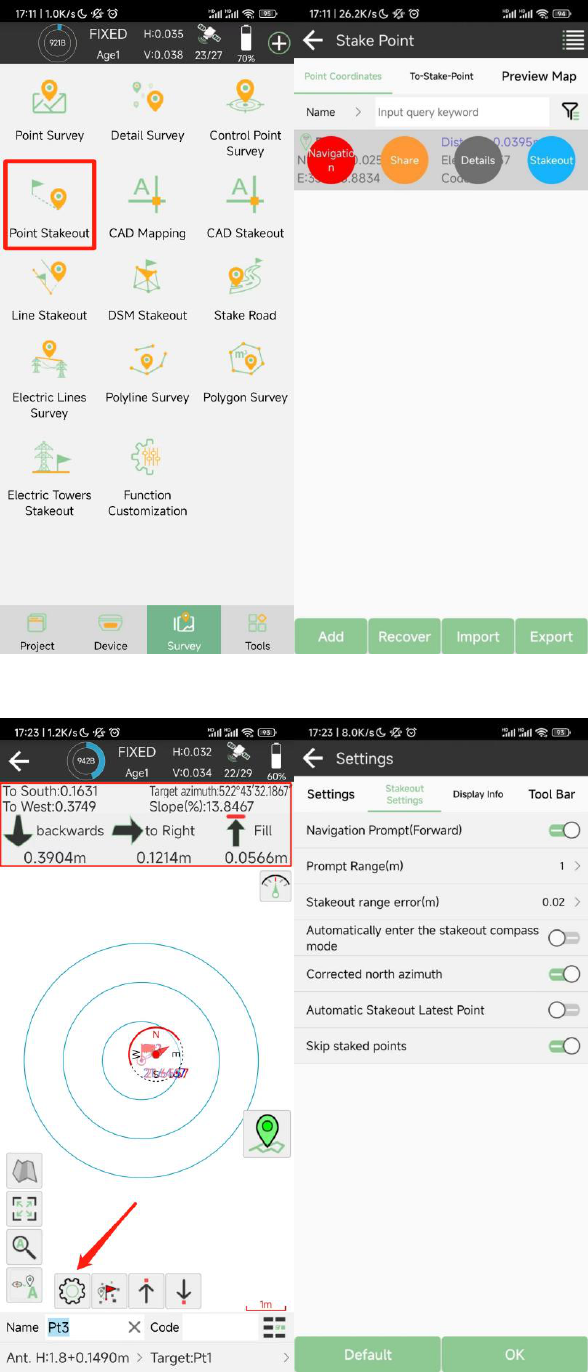
3.5 Stake Out
Go to point stake out interface, you can choose the point in the point database to stake out. You
can add or import the point coordinates you need in point database.
Sfaira ONE GNSS Receiver User Manual
16
Choose a point to stake, SingularPad provides a navigation map when staking points/lines. If you
are close to the target point enough, it will alarm you based on the alarm range you set.

Sfaira ONE GNSS Receiver User Manual
17
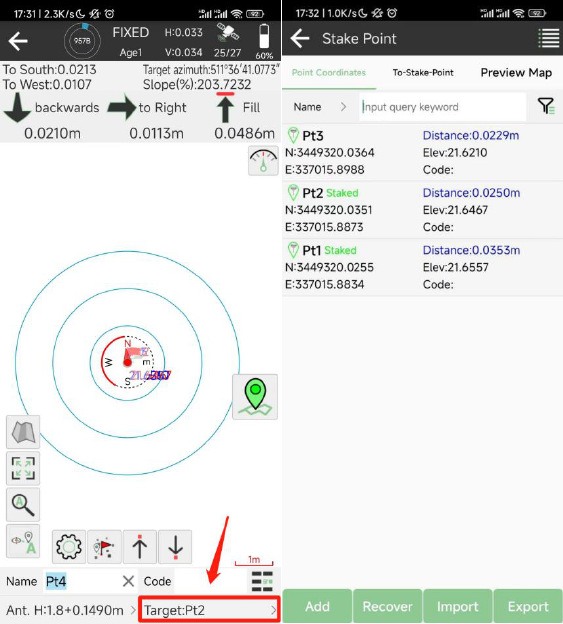
•
Click to start or stop stake points
•
Click to scale automatically
•
Click to jump to lasted point
•
Click to jump to next point
•
Click to jump to previous point
•
Click to set stakeout settings, display info and tool bar, you can edit the
prompt range and range error
•
Click to open compass
You can click the Target:Point in the lower right corner to change the point you stake out.
Sfaira ONE GNSS Receiver User Manual
18
Sfaira ONE GNSS Receiver User Manual
19
4 RTK Workflow In SingularSurv
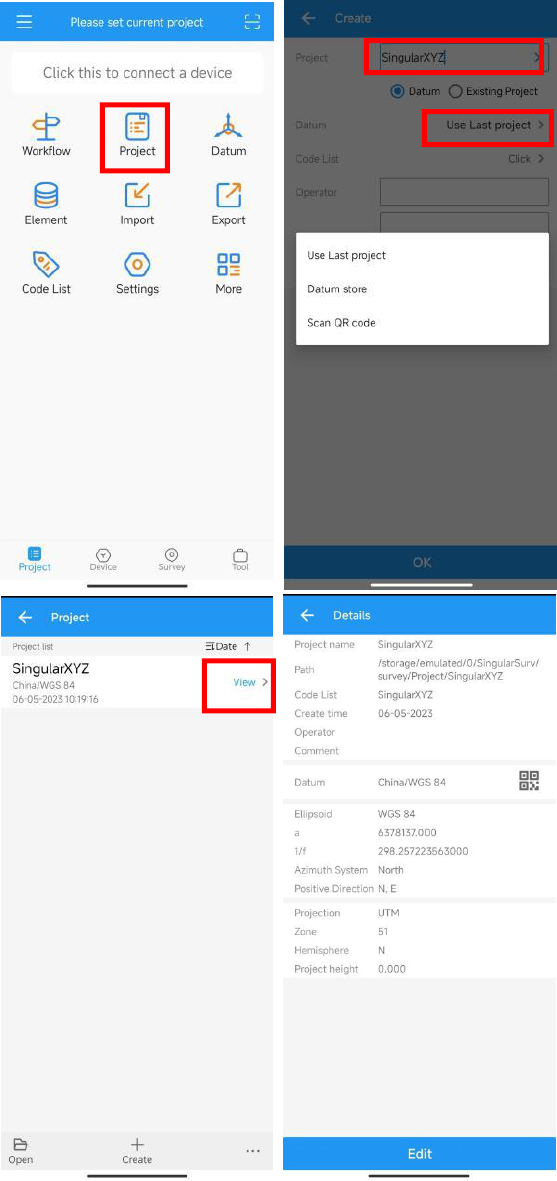
4.1 Create a new project
Click Project, set project name and select project datum

Sfaira ONE GNSS Receiver User Manual
20
In Project interface, you can click Create to add a new project or click Open to open the previous
project.
If you have added one project, you can click View or click the project name in the main interface
to check the current project details, including Project name, store path, and datum parameters.
Click the QR to share your datum information to others. Besides, click Edit to change the datum
parameters, also, you can change in the Datum interface.
To edit datum parameters, SingularSurv supports three methods: Use last project, Datum store,
Scan QR code.
Use Last project: If you have added datum before, then you can choose to use the datum of
last project for current project.
Scan QR code: Support to get the datum from other users.
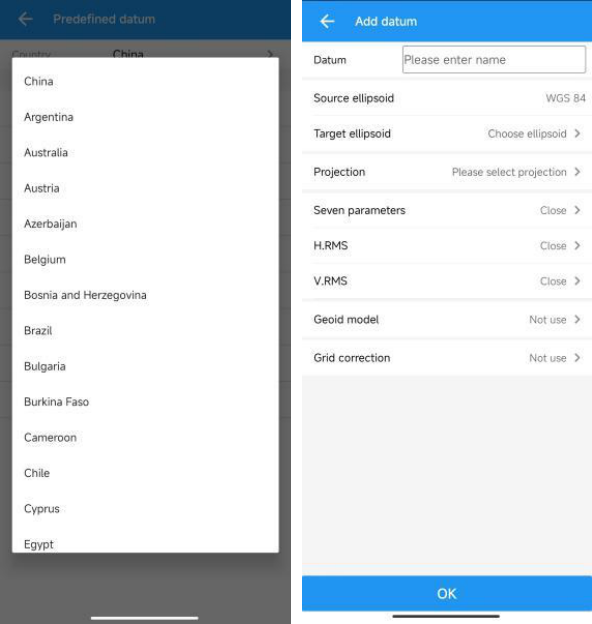
Datum store->Select a Predefined datum: You can select datum directly from the list.
SingularSurv currently has 49 countries datum and will add more afterwards. Create a User
defined datum: If you cannot find datum you want in the list, follow instructions below to
add one: select Source ellipsoid, Target ellipsoid, Projection for your datum, and even seven
parameters, geoid model based on your request.
Sfaira ONE GNSS Receiver User Manual
21
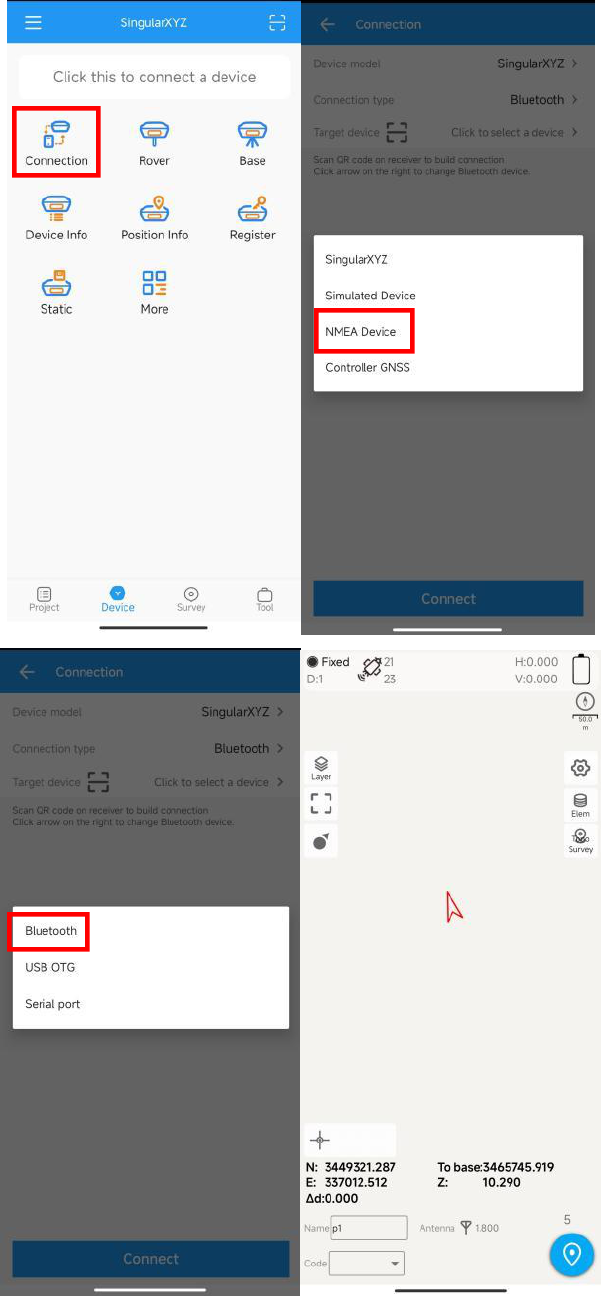
4.2 Connect to receiver
After creating a new project, switch to Device, tap Connection. Choose NMEA Device as Device
model, choose Bluetooth as Connection type, click to select the Sfaira ONE Bluetooth to connect,
the Bluetooth number is its SN.
Sfaira ONE GNSS Receiver User Manual
22
After connected successfully, the top will show the positioning status.
Sfaira ONE GNSS Receiver User Manual
23
Tips: If you failed to connect with receiver through SingularSurv, you can just follow prompt info
to go into the device Bluetooth setting interface to make sure Bluetooth paired successfully.
Sometimes you need restart the receiver or SingularSurv.
4.3 Quick Setup Your Receiver
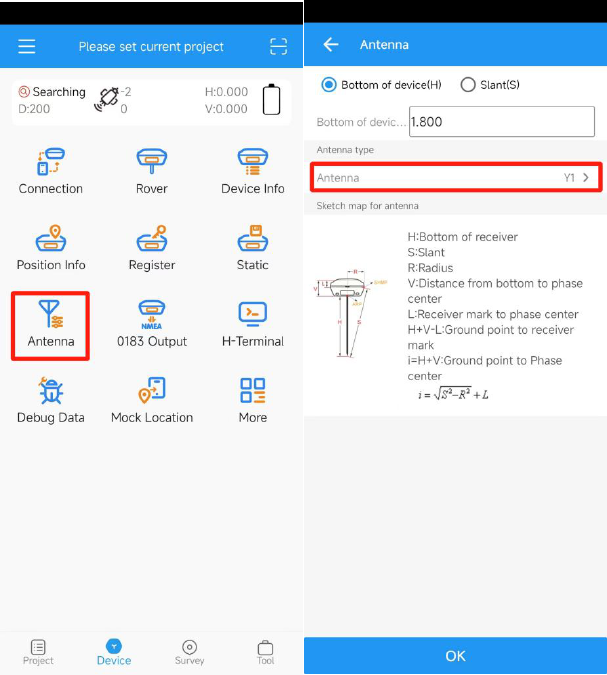
You should add an antenna model for Sfaira ONE, the antenna L1 offset parameter is :149mm,
you should add a model for Sfaira ONE and choose it.
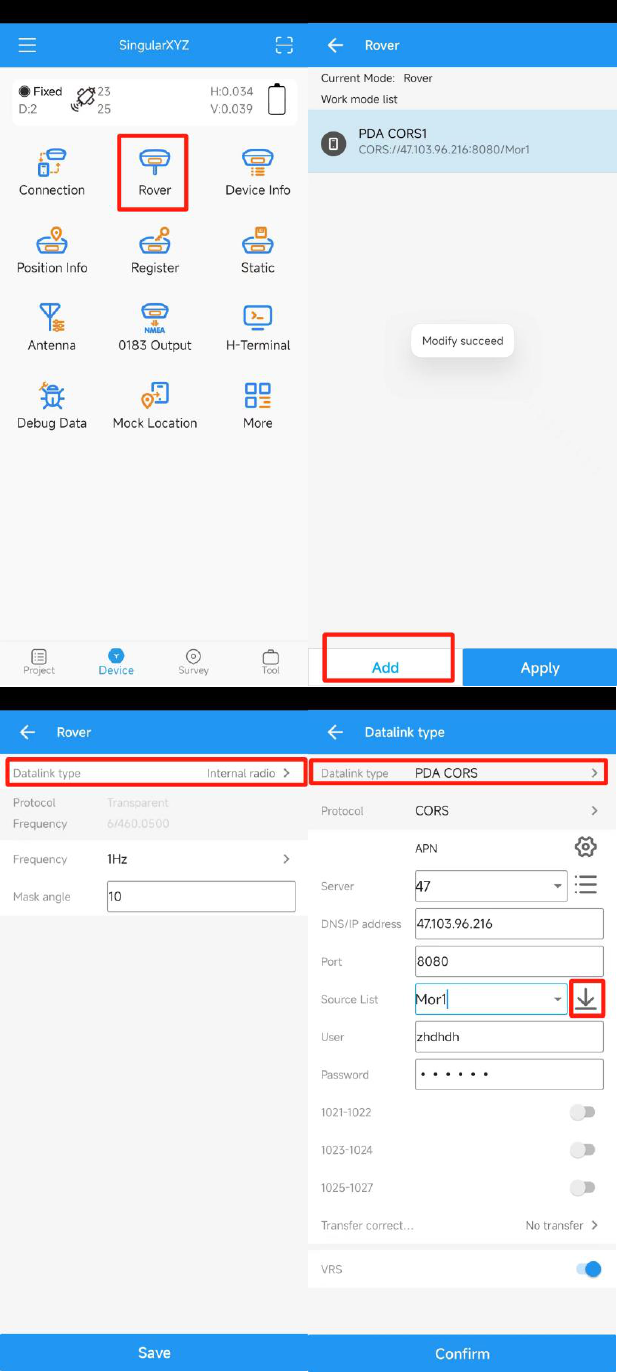
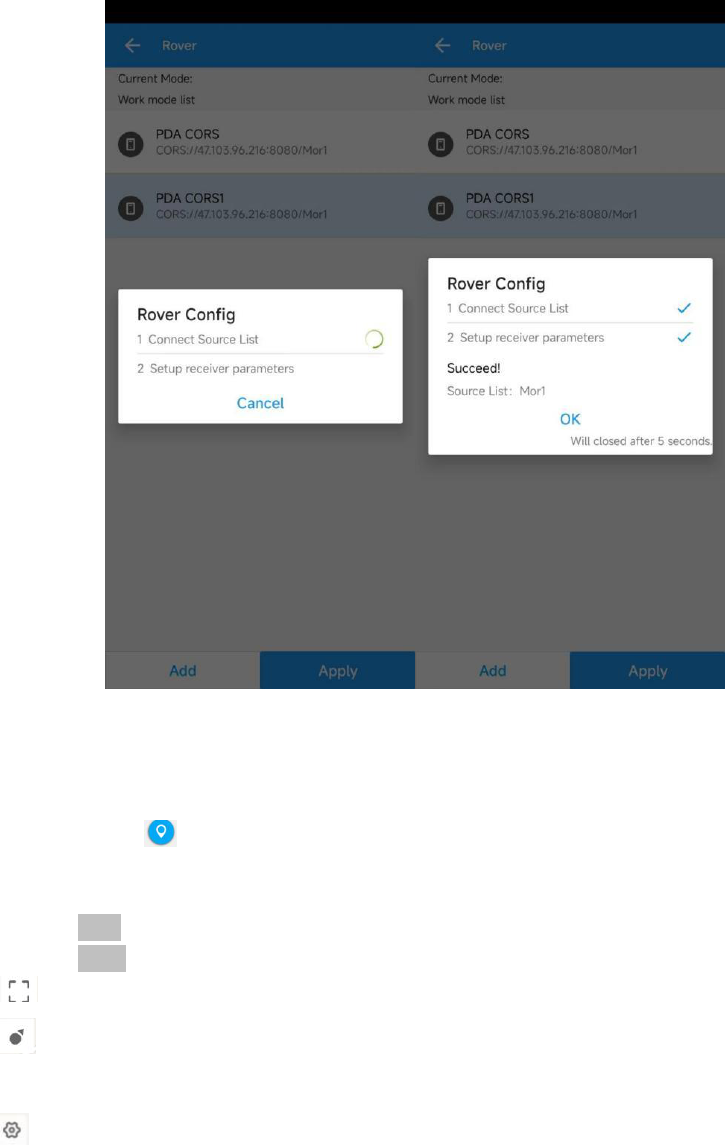
Go to Device>Rover to setup your Sfira ONE. You should click add to add a work mode. Choose
the PDA CORS as Data link type, enter the ip address, port, user and password, click get to get the
mount point, select the base. Click confirm and OK to save the work mode, click apply to apply
the work, when it is applied successfully, please back to the main interface to check the RTK
status.

Sfaira ONE GNSS Receiver User Manual
24
Sfaira ONE GNSS Receiver User Manual
25
Sfaira ONE GNSS Receiver User Manual
26
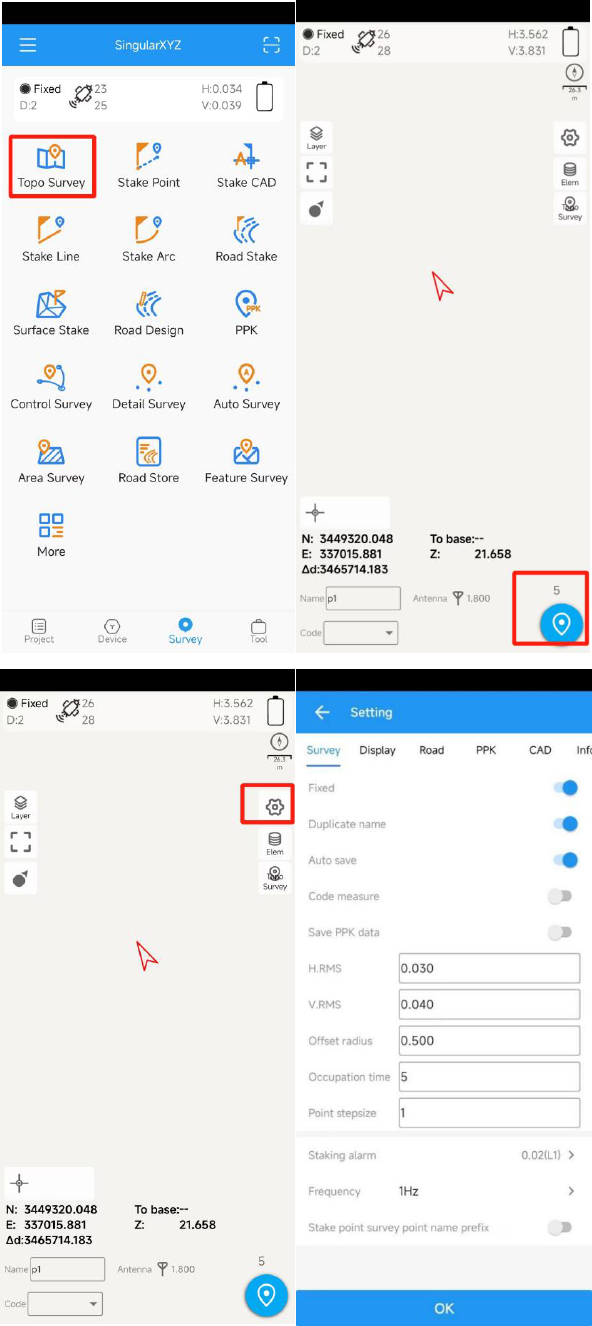
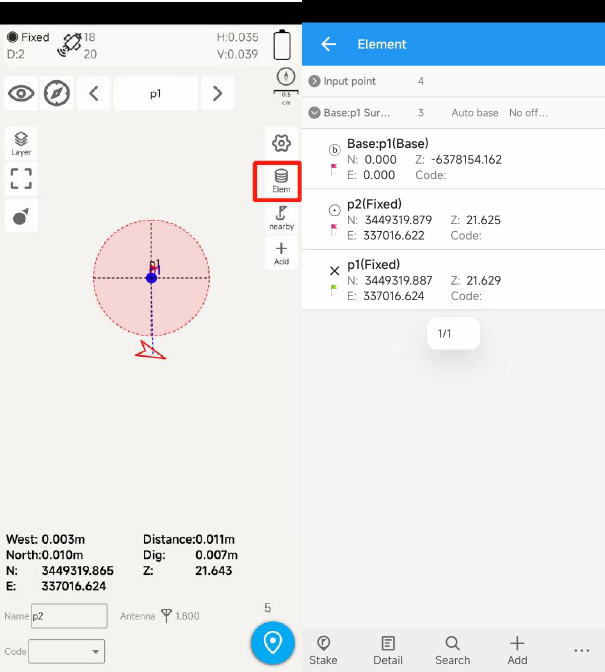
4.4 Survey
When you get the fixed solution, you can go to survey, go to survey> Topo survey, enter point
name, ->click to start or stop collecting data. You can check
You can quickly change antenna height in the survey interface.
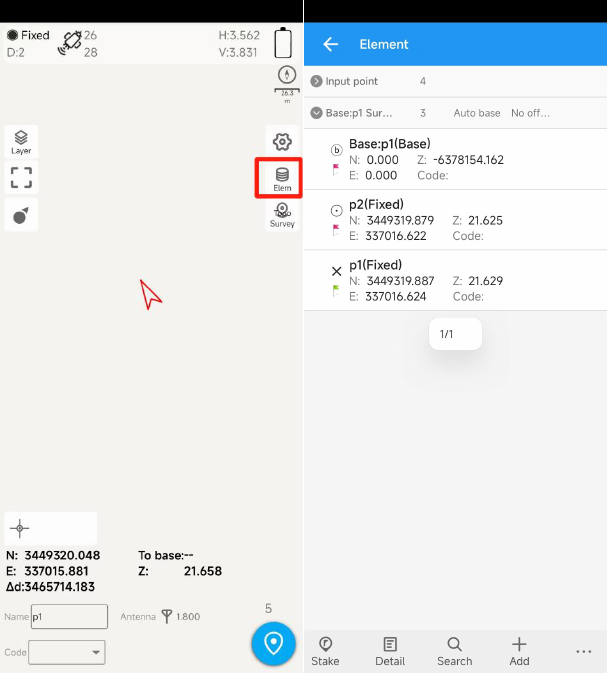
Tap Elem to check point coordinates you surveyed.
Tap Layer to show the layers: google map/google satellite/DXF/SHP
: Click this to show the whole points on the interface.
: If the arrow is out of sight on the interface, you can click this to locate the receiver position,
then the arrow will be shown on the interface.
: You should set the measurement parameters, such as RMS limit, Occupation time, etc
Sfaira ONE GNSS Receiver User Manual
27
Sfaira ONE GNSS Receiver User Manual
28
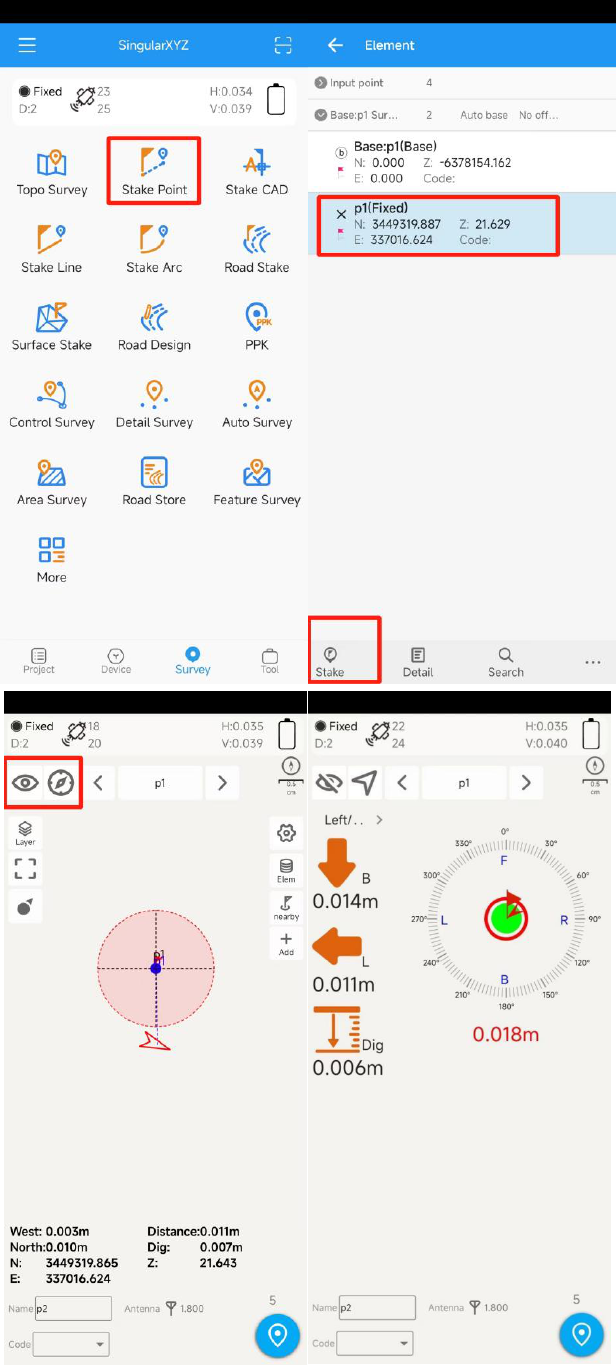
4.5 Stake Out
Go into Stake point interface, click to choose a point and tap Stake. SingularSurv
provides a navigation map when staking points/lines. If you are close to the target
point enough, it will alarm you based on the alarm range you set.
Sfaira ONE GNSS Receiver User Manual
29
Sfaira ONE GNSS Receiver User Manual
30

Sfaira ONE GNSS Receiver User Manual
31
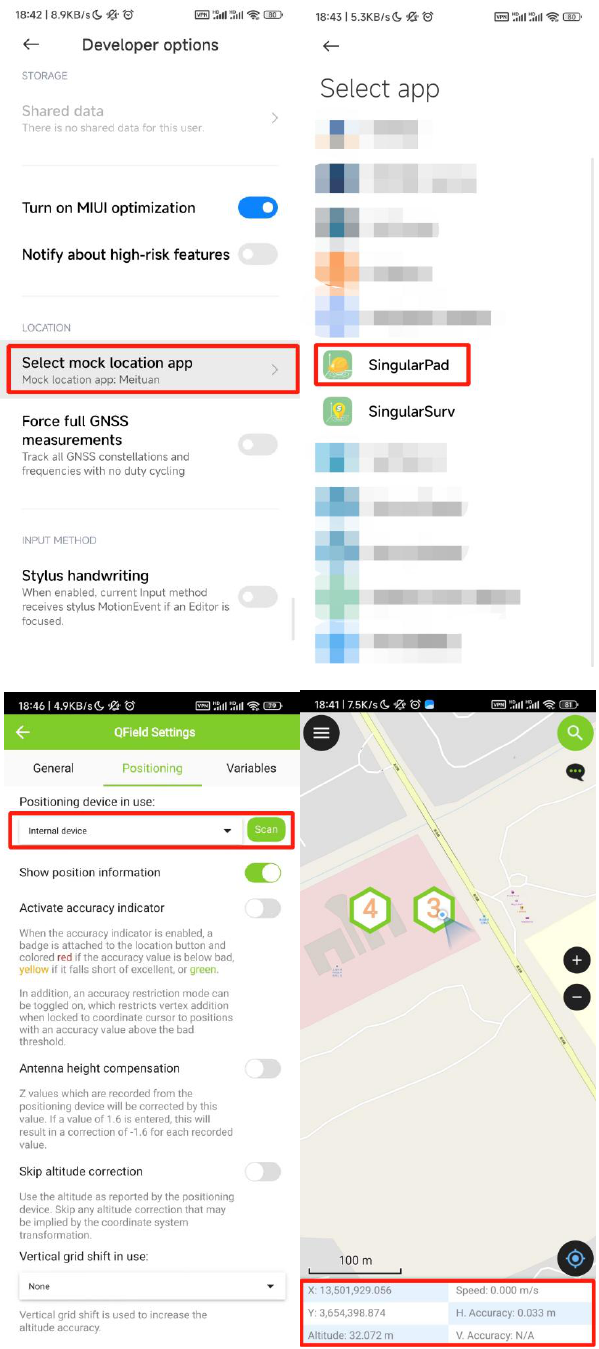
5 Connect with GIS Software
The Sfaira ONE receiver is very suitable for GIS measurement. Compared to ordinary receivers, it
has smaller size, lighter weight, and retains powerful performance. If you want to use Sfaira ONE
and other GIS software for measurement, please follow the following steps. Let's take Qfield as an
example.
First, you should connect Sfaira ONE with SingularPad, and setup it to get a fixed solution.
Second, In the software setting, enable the location services, it will share the high precision
positioning data to the controller.
Go to the system settings of your controller, click the system version 5 times to open the developer
option. In the developer option, there is a function Select mock location app, this function will use
the position from the app as the position of controller, and you should select SingularPad.
After that, you can go to Qfield, choose the Positioning Device as internal device, it will use the
position of the controller which is RTK fixed position from the Sfaira one.
Then you can do your GIS work.
Sfaira ONE GNSS Receiver User Manual
32
FCC Warning
This device complies with part 15 of the FCC rules. Operation is subject to the following two conditions: (1) this device may
not cause harmful interference, and (2) this device must accept any inte rference received, including interference that may cause
undesired operation.
Changes or modifications not expressly approved by the party responsible for compliance could void the user's authority to
operate the equipment.
NOTE: This equipment has been tested and found to comply with the limits for a Class B digital device, pursuant to part 15 of
the FCC Rules. These limits are designed to provide reasonable protection against harmful interference in a residential
installation. This equipment generates uses and can radiate radio frequency energy and, if not installed and used in accordance
with the instructions, may cause harmful interference to radio communications. However, there is no guarantee that
interference will not occur in a particular installation. If this equipment does cause harmful interferenceto radio or television
reception, which can be determined by turning the equipment off and on, the user is encouraged to try to correct the
interference by one or more of the following measures:
· Reorient or relocate the receiving antenna.
· Increase the separation between the equipment and receiver.
· Connect the equipment into an outlet on a circuit different from that to which the receiver is connected.
· Consult the dealer or an experienced radio/TV technician for help.
Radiation Exposure Statement
The device has been evaluated to meet general RF exposure requirement. The device can be used in portable exposure
condition without restriction.
